> ## Documentation Index
> Fetch the complete documentation index at: https://docs.metrifox.com/llms.txt
> Use this file to discover all available pages before exploring further.
# Payments
## **Overview**
Metrifox supports direct integrations with popular payment gateways to process transactions, subscriptions, and recurring billing.
Connecting a provider enables:
* Automatic invoice generation and payment collection.
* Recurring subscriptions with retries and webhooks.
* Secure PCI-compliant handling (no card data stored in Metrifox).
Supported providers:
* **Paystack** (recommended for Nigeria/Africa-focused businesses — lower fees, fast payouts).
* **Stripe** (global reach, multi-currency).
* **Flutterwave** (supports payments across more African countries and local methods).
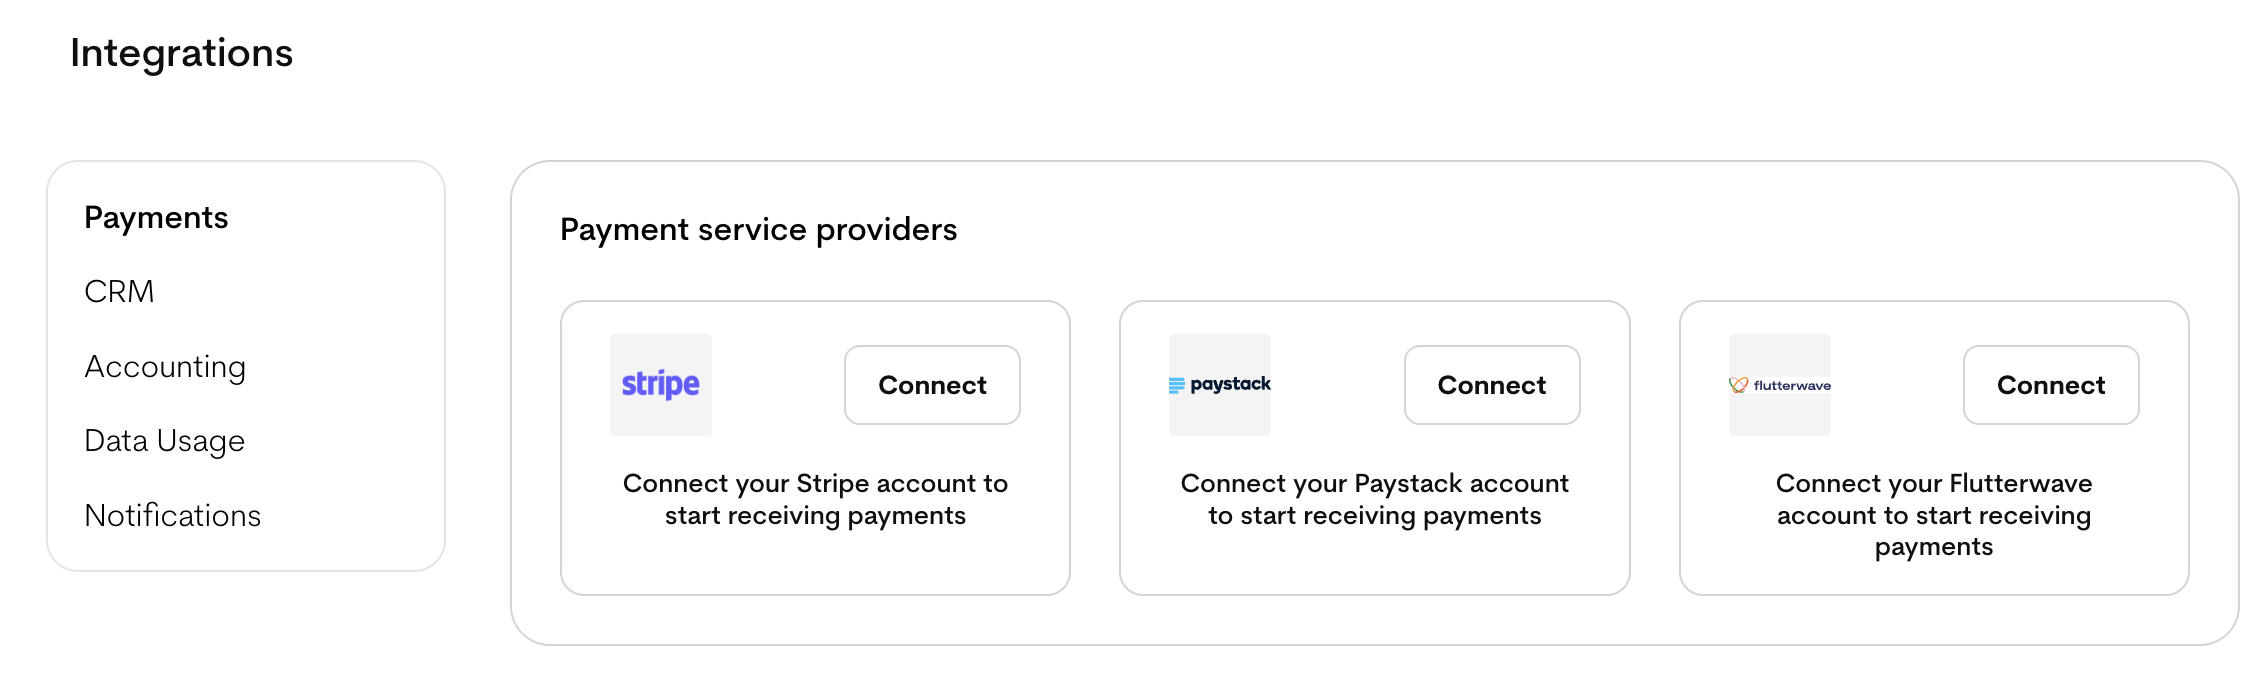
You connect providers in the **Integrations** section of your Metrifox dashboard. Once connected, payments flow seamlessly for launched plans.
## **Connecting a Payment Provider**
1. Log in to your Metrifox dashboard.
2. Navigate to **Integrations** from the sidebar
3. In the **Payment Providers** section, click **Connect** next to the provider you choose to use.
Once connected, payments work for launched plans.
 ###
### **Connecting Stripe**
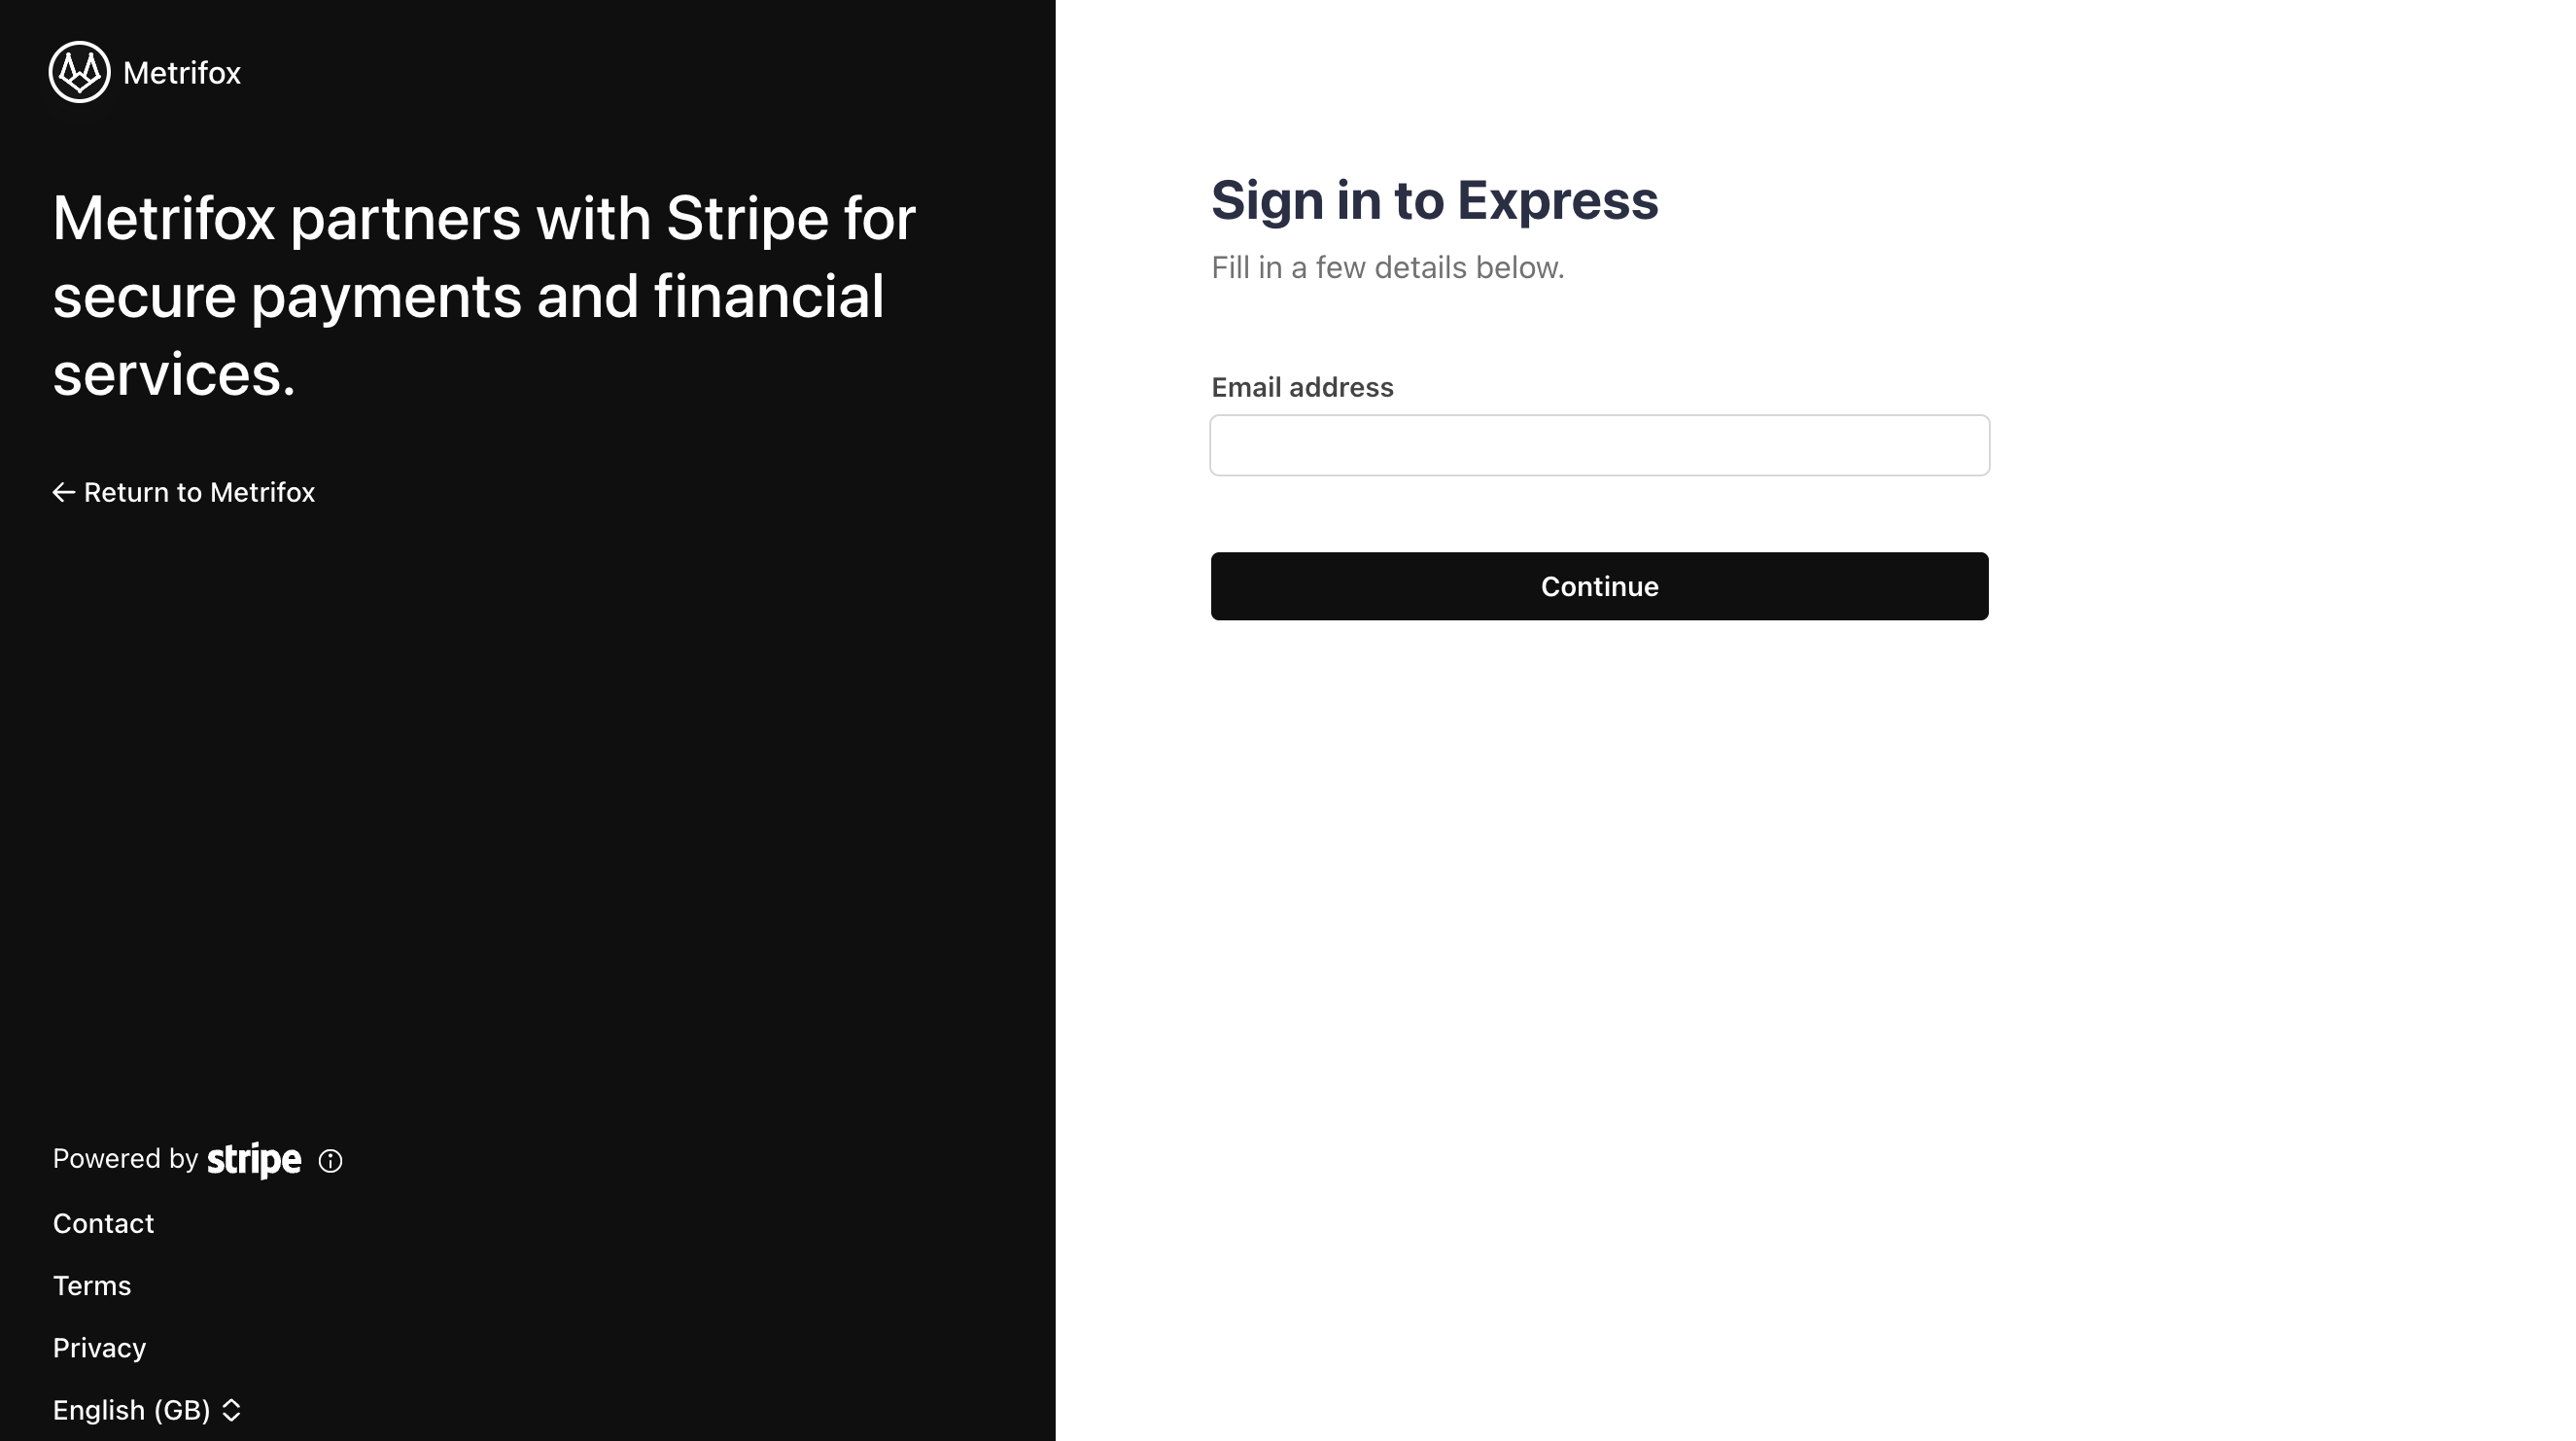
1. Clicking the **Connect** button next to **Stripe**. This opens a new tab to Stripe Express onboarding.
2. In the Stripe tab:
* Sign in to an existing Stripe account or create one.
* Fill in required details (email, business info).
* Authorize Metrifox to connect.
###
### **Connecting Stripe**
1. Clicking the **Connect** button next to **Stripe**. This opens a new tab to Stripe Express onboarding.
2. In the Stripe tab:
* Sign in to an existing Stripe account or create one.
* Fill in required details (email, business info).
* Authorize Metrifox to connect.
 Once completed, Stripe is connected and ready to process payments for launched plans.
### **Connecting Paystack**
1. Click **Connect** next to **Paystack**
2. In the modal:
* Enter your **Public Key** and **Secret Key** (from Paystack Dashboard → Settings → API Keys & Webhooks).
* **Important**: Copy the webhook URL shown ([https://api.metrifox.com/api/v1/payments/paystack/webhooks](https://api.metrifox.com/api/v1/payments/paystack/webhooks)).
Once completed, Stripe is connected and ready to process payments for launched plans.
### **Connecting Paystack**
1. Click **Connect** next to **Paystack**
2. In the modal:
* Enter your **Public Key** and **Secret Key** (from Paystack Dashboard → Settings → API Keys & Webhooks).
* **Important**: Copy the webhook URL shown ([https://api.metrifox.com/api/v1/payments/paystack/webhooks](https://api.metrifox.com/api/v1/payments/paystack/webhooks)).
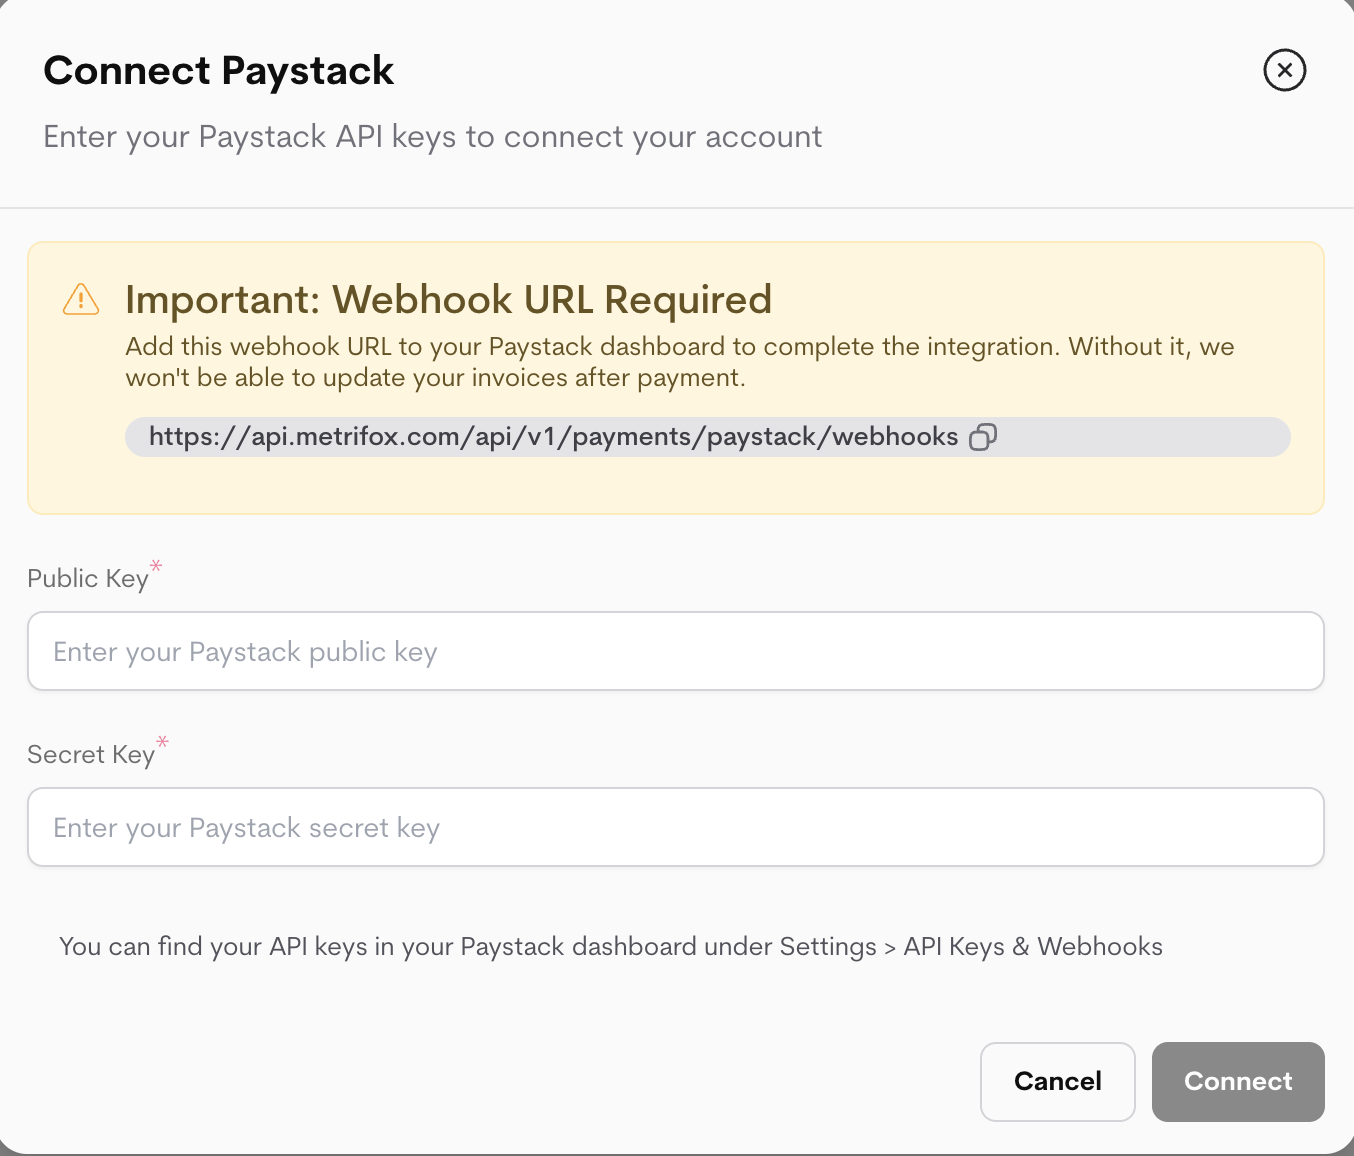 3. Click **Connect**.
4. Manually add the webhook in Paystack:
* Log in to Paystack Dashboard.
* Go to **Settings → API Keys & Webhooks**.
* Paste the Metrifox webhook URL.
* Save.
**Why the webhook matters**
Without it, Metrifox can't receive payment updates (e.g., successful charges, subscription renewals), invoices won't update automatically.
### **Connecting Flutterwave**
1. Click **Connect** next to Flutterwave.
2. In the modal:
* Enter your **Public Key**, \*\*Secret Key \*\*and **Encryption key** (from Flutterwave Dashboard → Settings → API Keys).
3. Click **Connect**.
4. Manually add the webhook in Paystack:
* Log in to Paystack Dashboard.
* Go to **Settings → API Keys & Webhooks**.
* Paste the Metrifox webhook URL.
* Save.
**Why the webhook matters**
Without it, Metrifox can't receive payment updates (e.g., successful charges, subscription renewals), invoices won't update automatically.
### **Connecting Flutterwave**
1. Click **Connect** next to Flutterwave.
2. In the modal:
* Enter your **Public Key**, \*\*Secret Key \*\*and **Encryption key** (from Flutterwave Dashboard → Settings → API Keys).
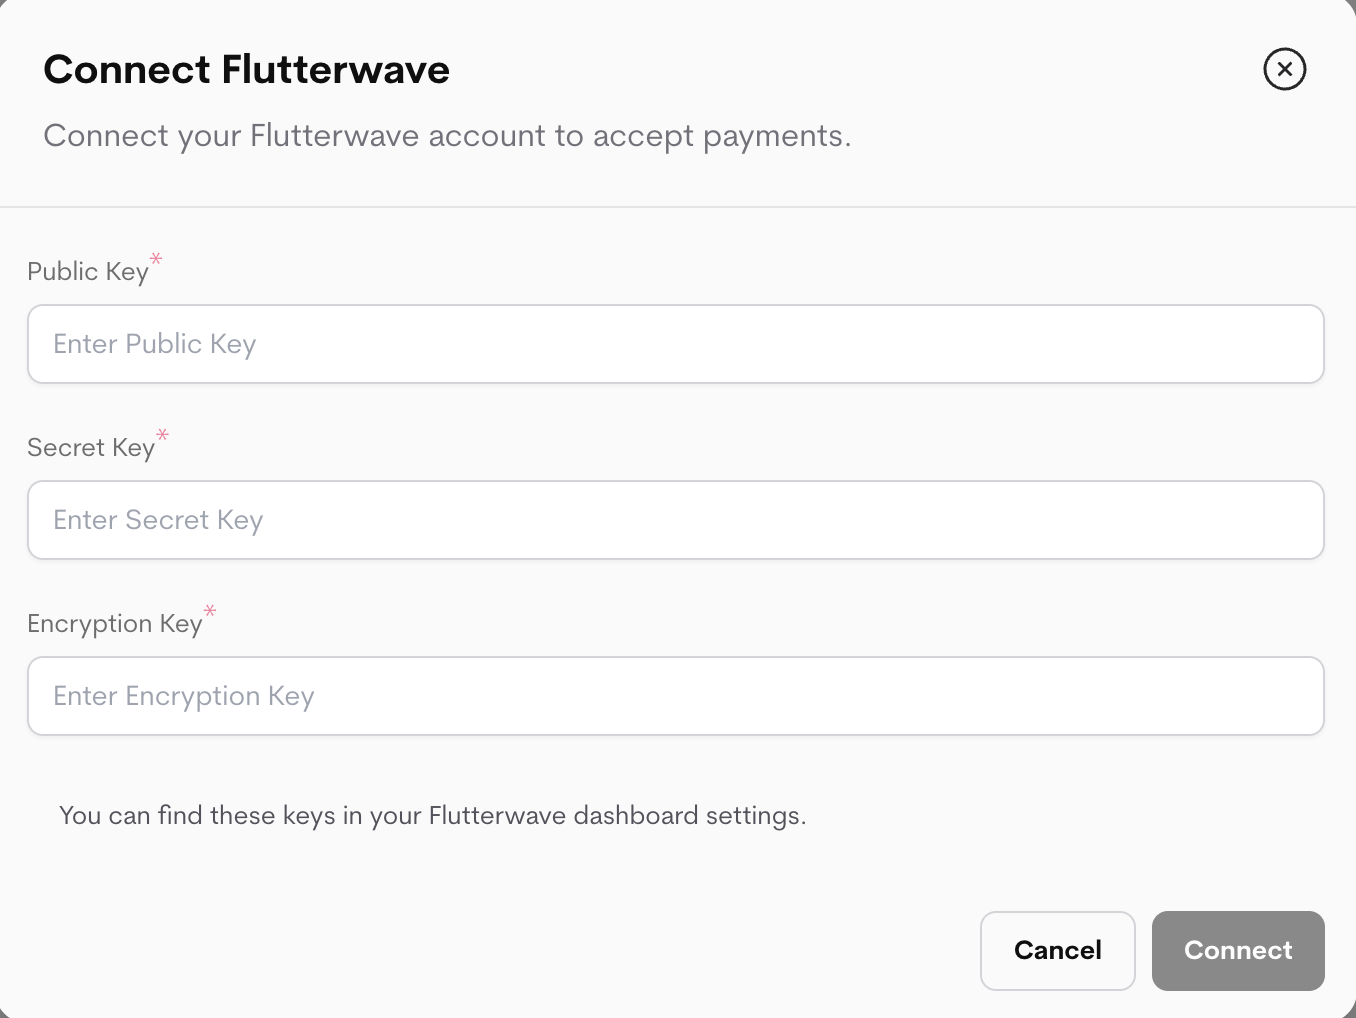 3. Click **Connect**.
4. On success, a new modal (or section) displays the Webhook URL and Webhook Secret/Hash.
**Important**: Copy both immediately and save them securely (e.g. in a password manager or notes). They are shown only after successful connection as you'll need them to configure the webhook later on in Flutterwave.
5. Manually configure the webhook in Flutterwave:
* Log in to Flutterwave Dashboard.
* Go to **Settings → Webhooks**.
* Paste the **Webhook URL**
* Enter the **Webhook Hash** as the verification secret.
* Save.
## **Manual Bank Payments (Alternative)**
Not every business needs a PSP. If you prefer to collect payments out-of-band — bank transfer, cash, cheque, offline — Metrifox supports that natively. You can use this on its own, or alongside a connected PSP.
**Step 1 — Add your business bank account**
1. Go to **Settings → General → Business Bank Account**. ([Direct link](https://app.metrifox.com/settings/general?modal=tenant_bank_account))
2. Enter your bank name, account number, and account name.
3. Save.
Adding the account doesn't show it on invoices yet. Go to **Settings → Invoicing** and toggle **Show bank account details** on. Once enabled, your bank details appear on every invoice Metrifox issues, so customers know where to send funds.
**Step 2 — Record payments against invoices**
When funds land in your bank account, mark the invoice paid in Metrifox so customer balances, subscription status, and revenue reports stay accurate.
1. Go to **Billings → Invoices** and open the invoice the payment is for. ([Invoices page](https://app.metrifox.com/billings/invoices))
2. Click **Record Manual Payment**.
3. Enter the amount paid, the payment date, and an optional reference (e.g. bank transaction ID).
4. Save. The invoice is marked paid (or partially paid), and any gated subscription is activated.
**When to use which**
* Use a **PSP** if you want automatic card charging, retries, and hands-off renewals.
* Use **manual payments** if your customers pay by bank transfer or you operate in a market where card-on-file is uncommon.
* **Both together** is supported: a PSP handles card-paying customers automatically, and you record bank transfers manually for the rest.
3. Click **Connect**.
4. On success, a new modal (or section) displays the Webhook URL and Webhook Secret/Hash.
**Important**: Copy both immediately and save them securely (e.g. in a password manager or notes). They are shown only after successful connection as you'll need them to configure the webhook later on in Flutterwave.
5. Manually configure the webhook in Flutterwave:
* Log in to Flutterwave Dashboard.
* Go to **Settings → Webhooks**.
* Paste the **Webhook URL**
* Enter the **Webhook Hash** as the verification secret.
* Save.
## **Manual Bank Payments (Alternative)**
Not every business needs a PSP. If you prefer to collect payments out-of-band — bank transfer, cash, cheque, offline — Metrifox supports that natively. You can use this on its own, or alongside a connected PSP.
**Step 1 — Add your business bank account**
1. Go to **Settings → General → Business Bank Account**. ([Direct link](https://app.metrifox.com/settings/general?modal=tenant_bank_account))
2. Enter your bank name, account number, and account name.
3. Save.
Adding the account doesn't show it on invoices yet. Go to **Settings → Invoicing** and toggle **Show bank account details** on. Once enabled, your bank details appear on every invoice Metrifox issues, so customers know where to send funds.
**Step 2 — Record payments against invoices**
When funds land in your bank account, mark the invoice paid in Metrifox so customer balances, subscription status, and revenue reports stay accurate.
1. Go to **Billings → Invoices** and open the invoice the payment is for. ([Invoices page](https://app.metrifox.com/billings/invoices))
2. Click **Record Manual Payment**.
3. Enter the amount paid, the payment date, and an optional reference (e.g. bank transaction ID).
4. Save. The invoice is marked paid (or partially paid), and any gated subscription is activated.
**When to use which**
* Use a **PSP** if you want automatic card charging, retries, and hands-off renewals.
* Use **manual payments** if your customers pay by bank transfer or you operate in a market where card-on-file is uncommon.
* **Both together** is supported: a PSP handles card-paying customers automatically, and you record bank transfers manually for the rest.