Overview
Plans are packaged product offerings that combine monetizable features, bill customers at fixed intervals (e.g. monthly or annually), and support trials or dynamic pricing models. With Metrifox, product managers and growth teams can manage plans, pricing, trial configurations, and included features without requiring engineering changes. Each plan’s functionality is governed by a set of features and their configuration, known in Metrifox as entitlements. Once launched, plans are rendered in customer-facing pricing tables using Metrifox’s SDKs.Creating a Plan
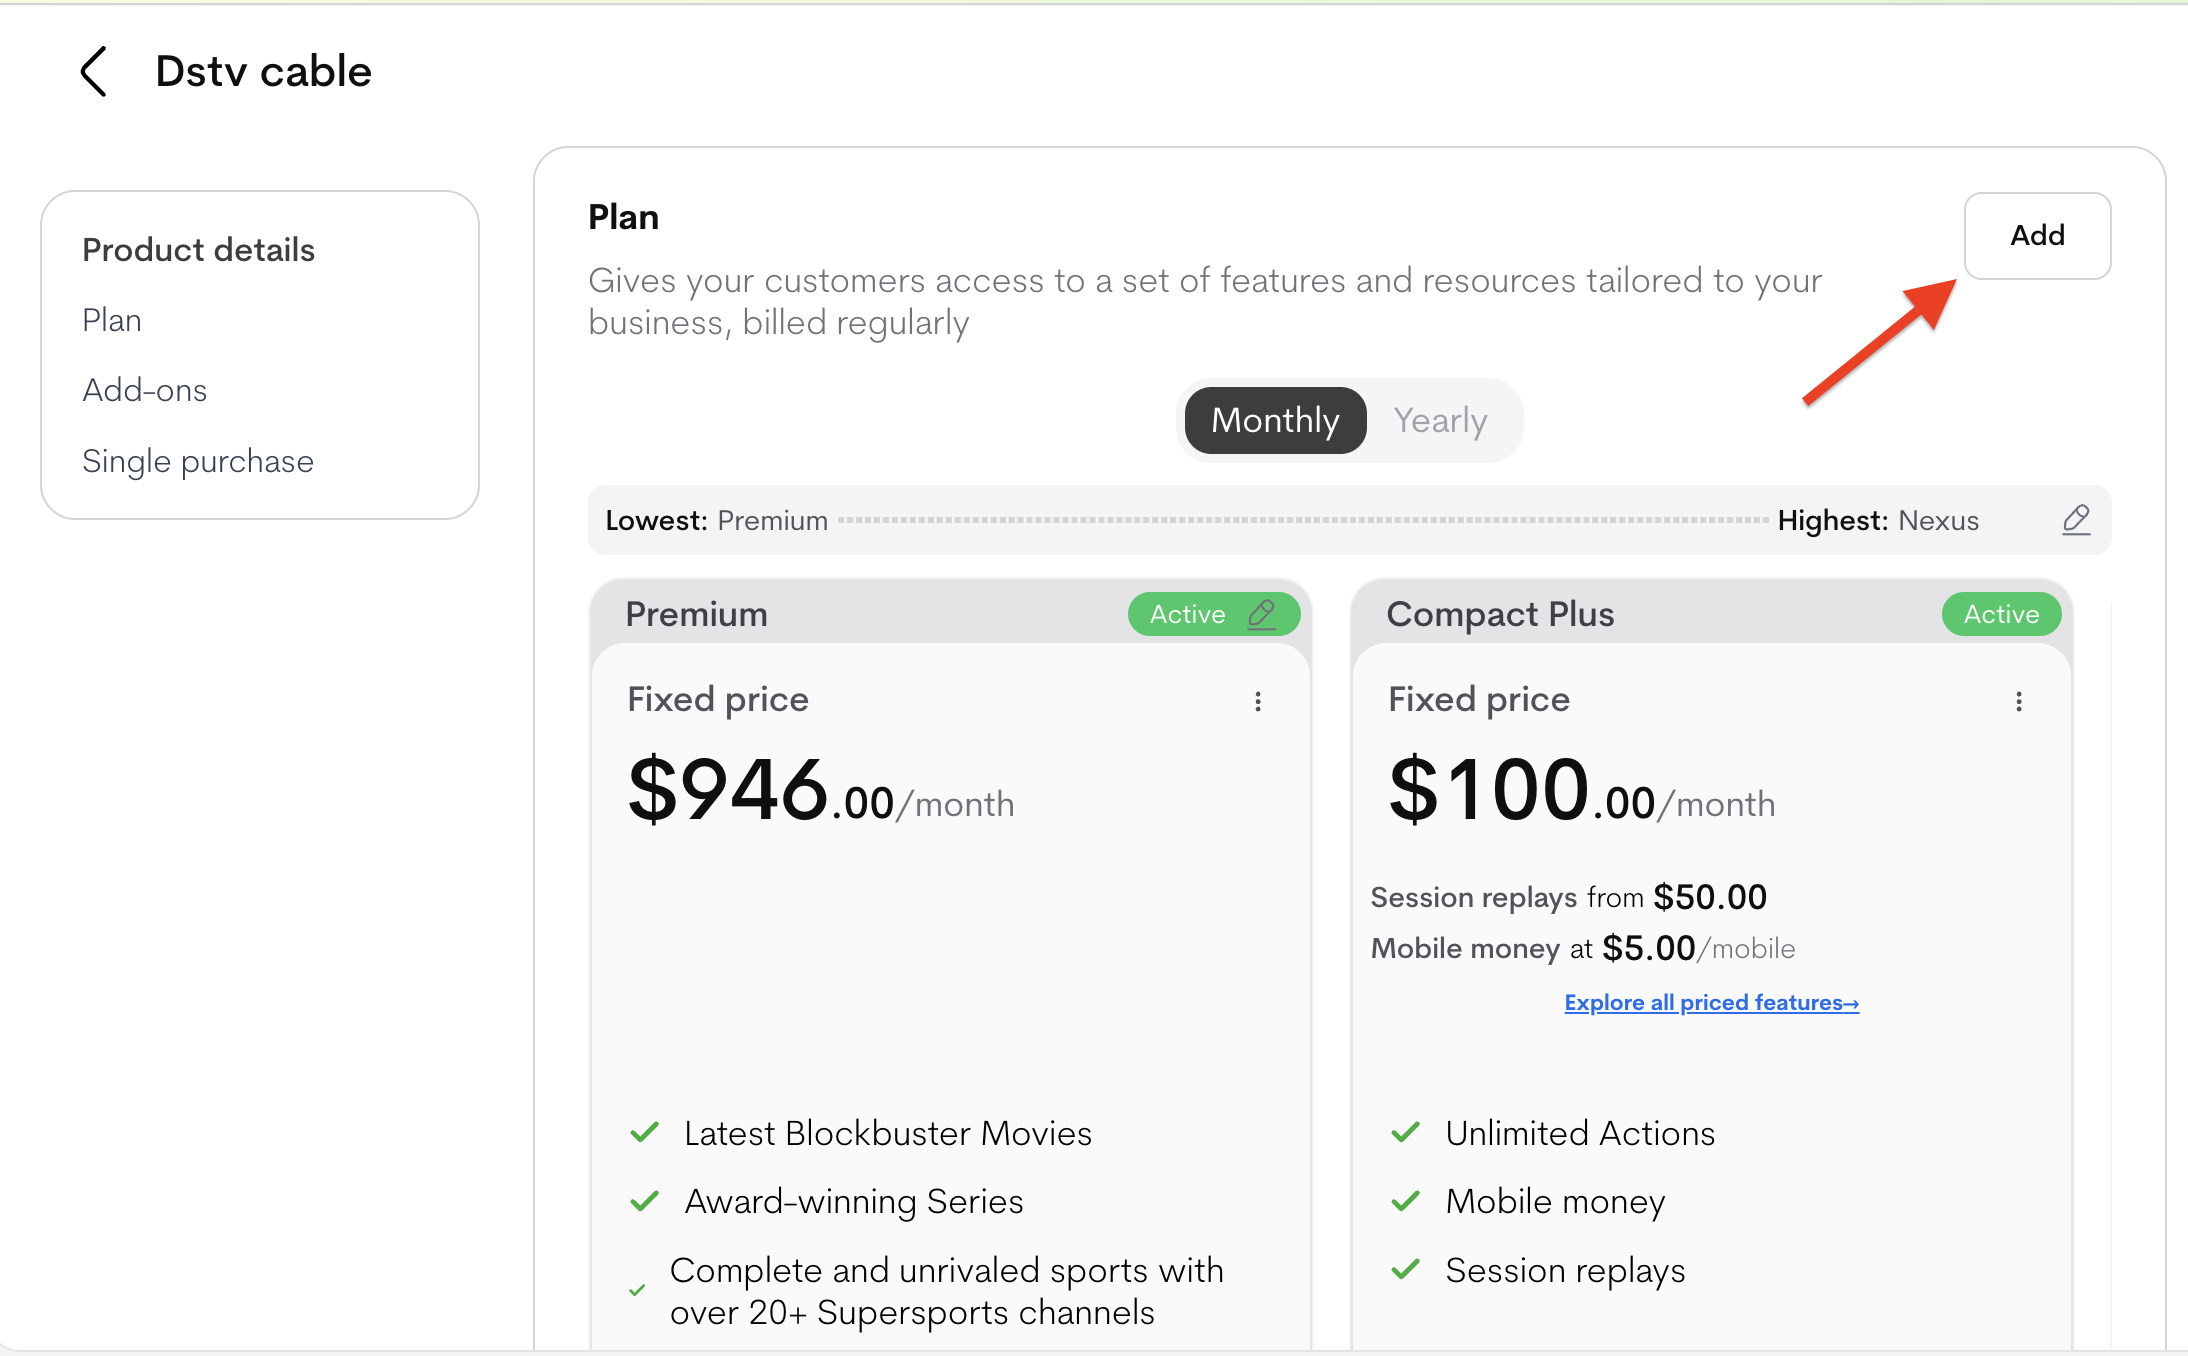
Plans are always attached to a specific Product, so they are created within the context of a product. Metrifox offers two ways to create a plan: Recommended way (from a product)- Navigate to Catalog → Products.
- Click on the product you want to add the plan to (this opens the product details page).
- Go to the Plans tab.
-
Click the Add button
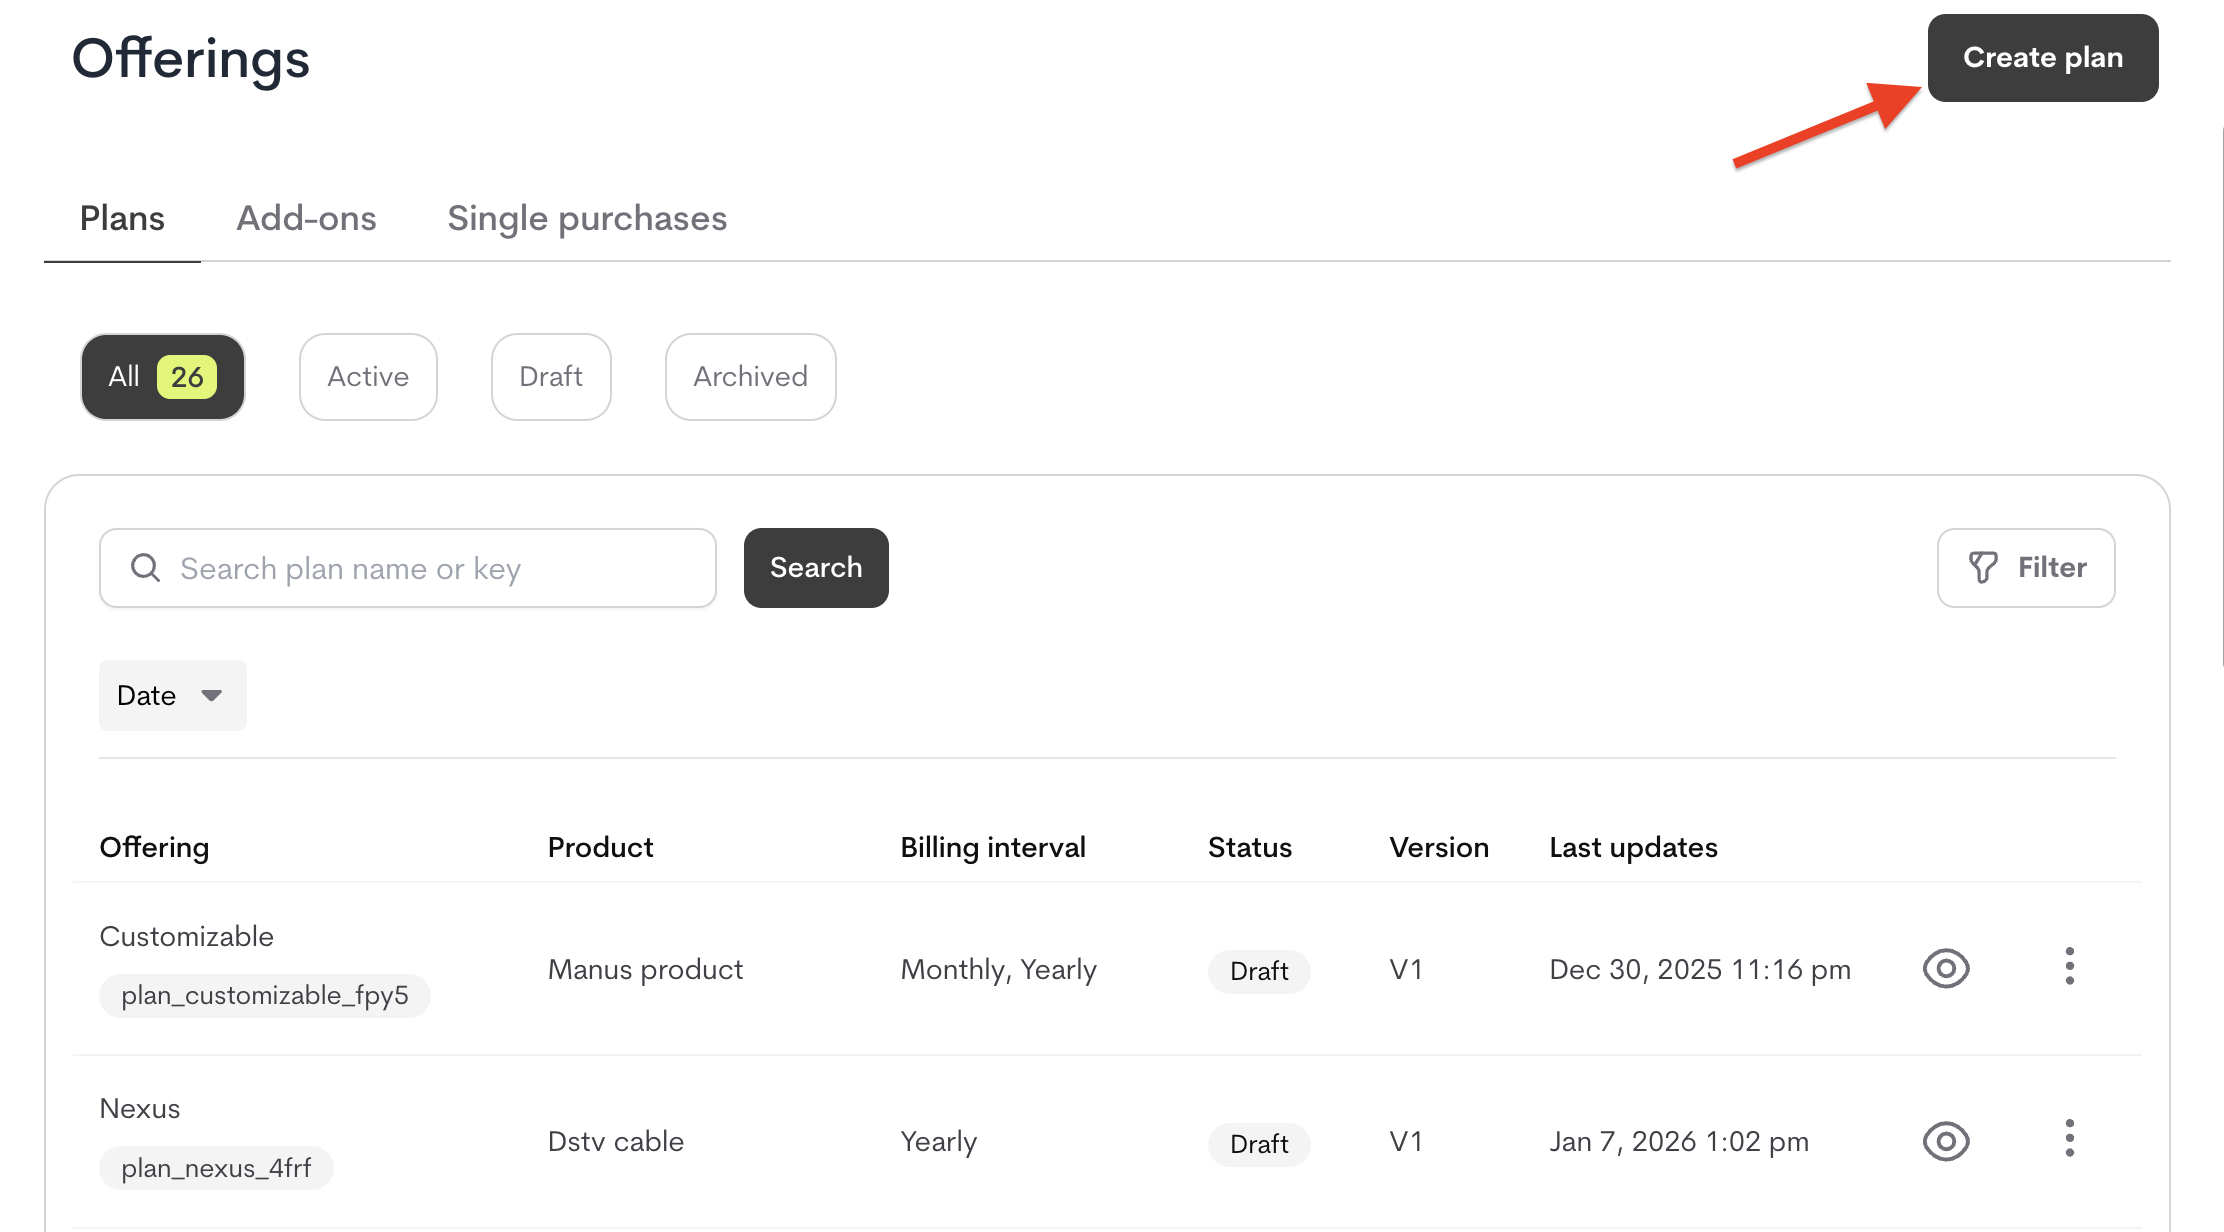
- Navigate to Catalog → Offerings
- On the Offering page, navigate to Plans
-
Click the “Create Plan” button
-
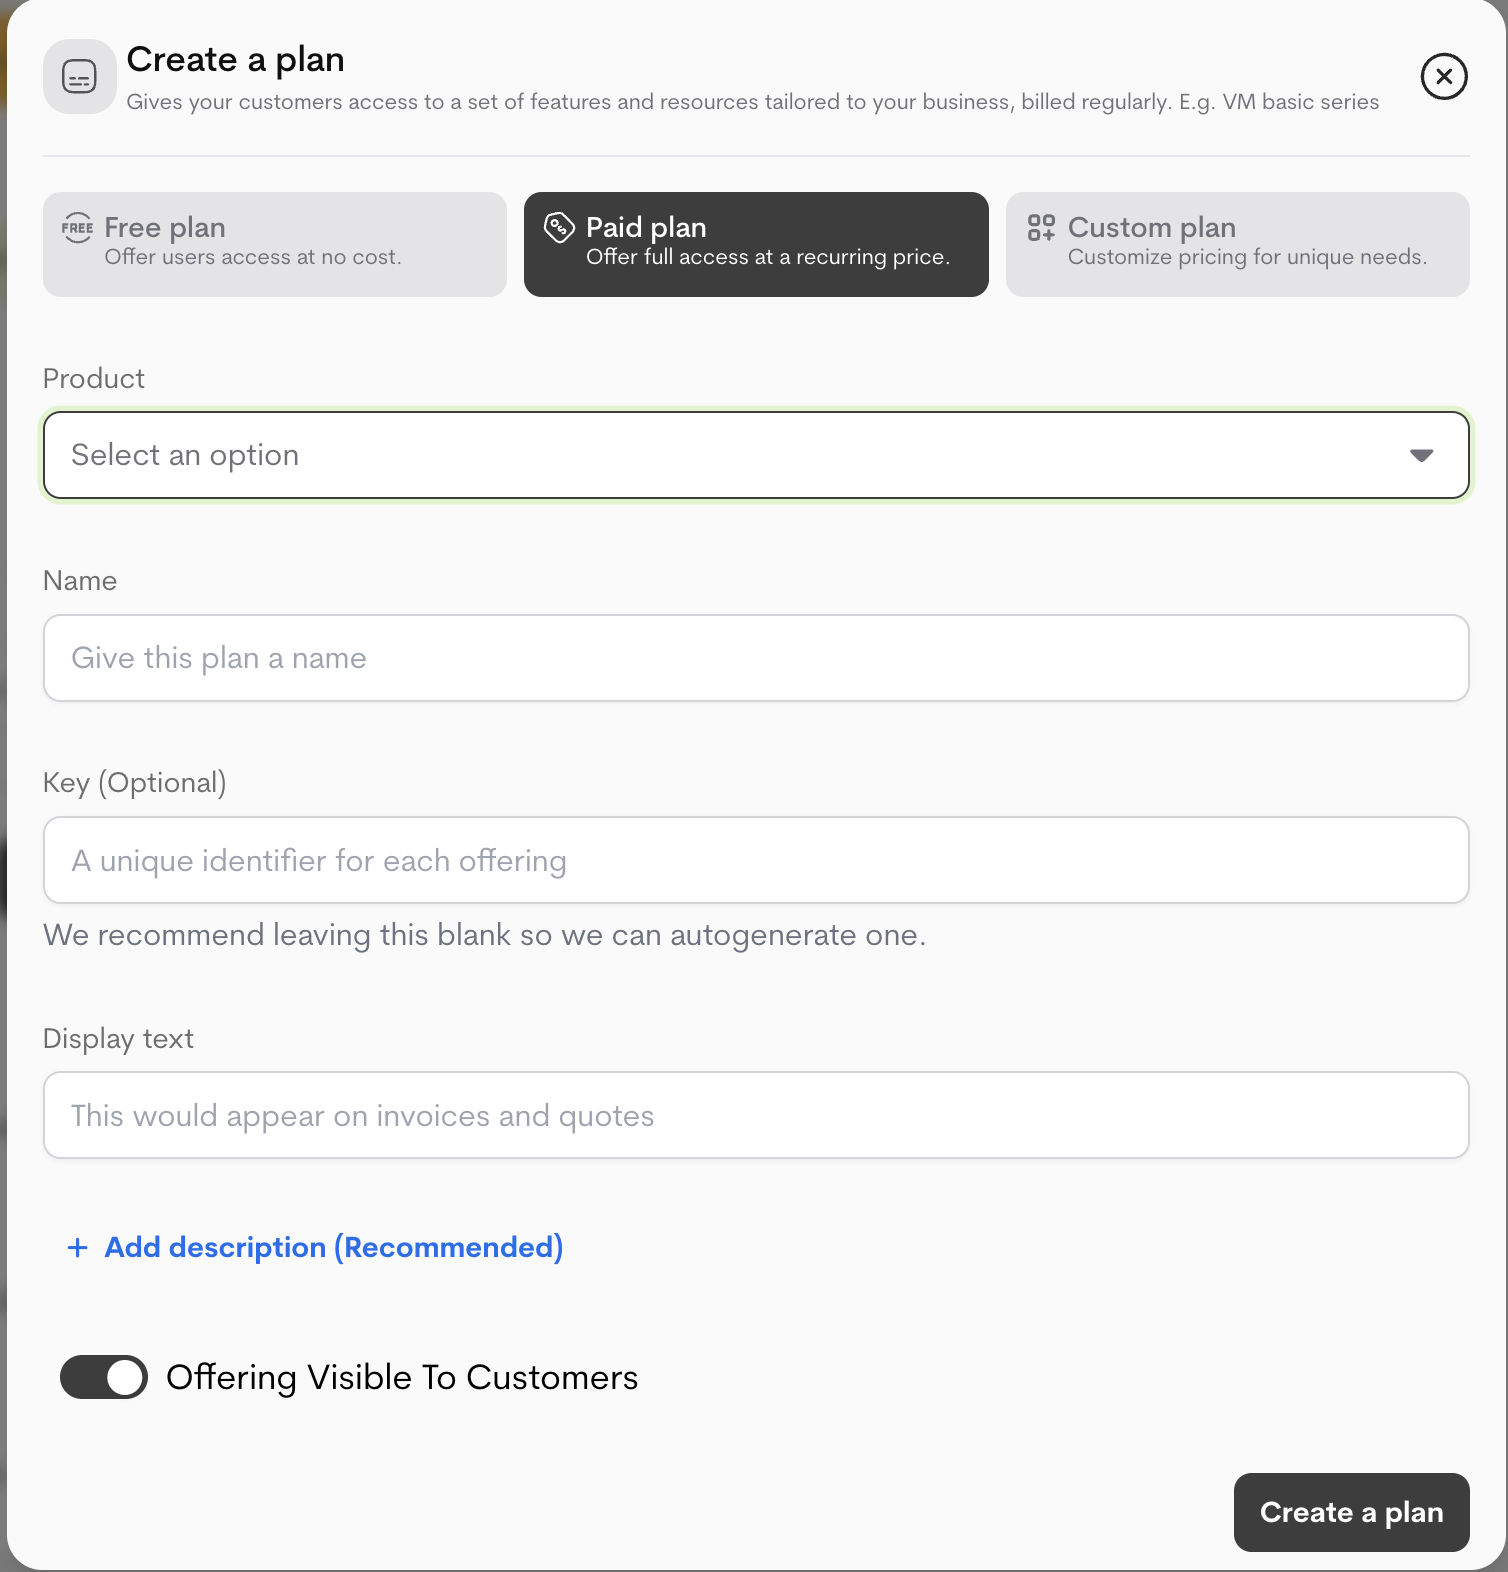
Select the Product from the dropdown menu
Why this matters: Links the plan to the correct product in your offerings
- Define Plan Details
| Field | Description | Recommendations |
|---|---|---|
| Name | Customer-facing plan name | Use clear tier names (e.g., “Starter” vs. “Enterprise”) |
| Description | Internal/external details | Highlight key benefits for customers |
| Plan Key | Auto-generated unique identifier | Customize if needed (e.g., starter_2024) |
| Customer Visibility | Toggle to show/hide in pricing | Keep off until fully configured |
-
Click “Create a plan”
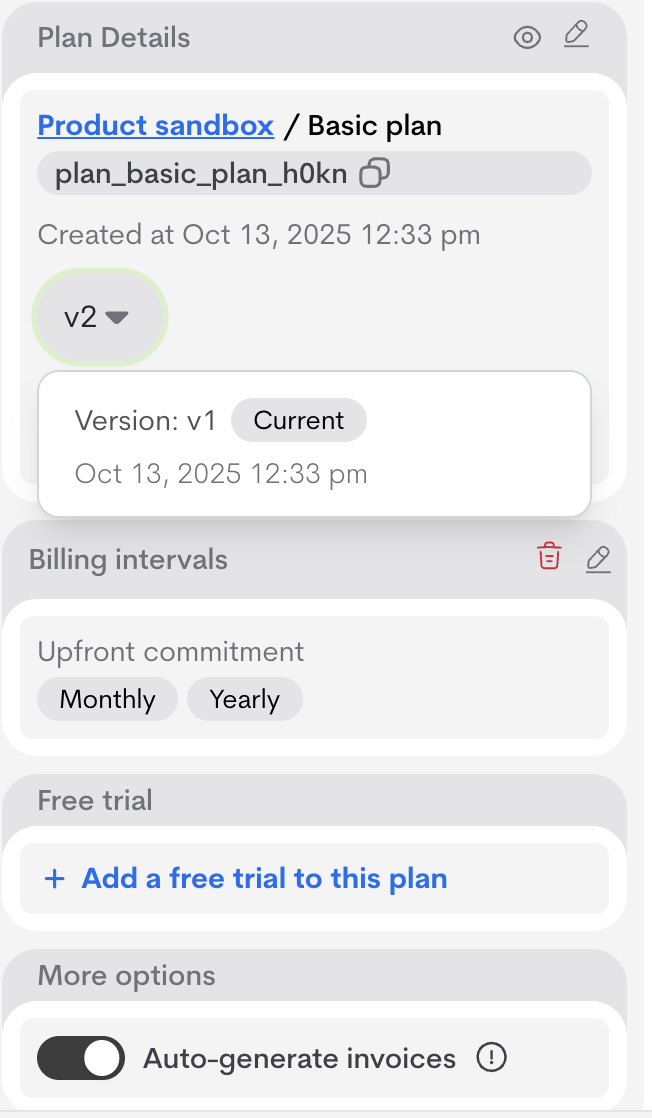
New plans are saved as drafts
Before Launching Your Plan
Setting up the Plan’s Price
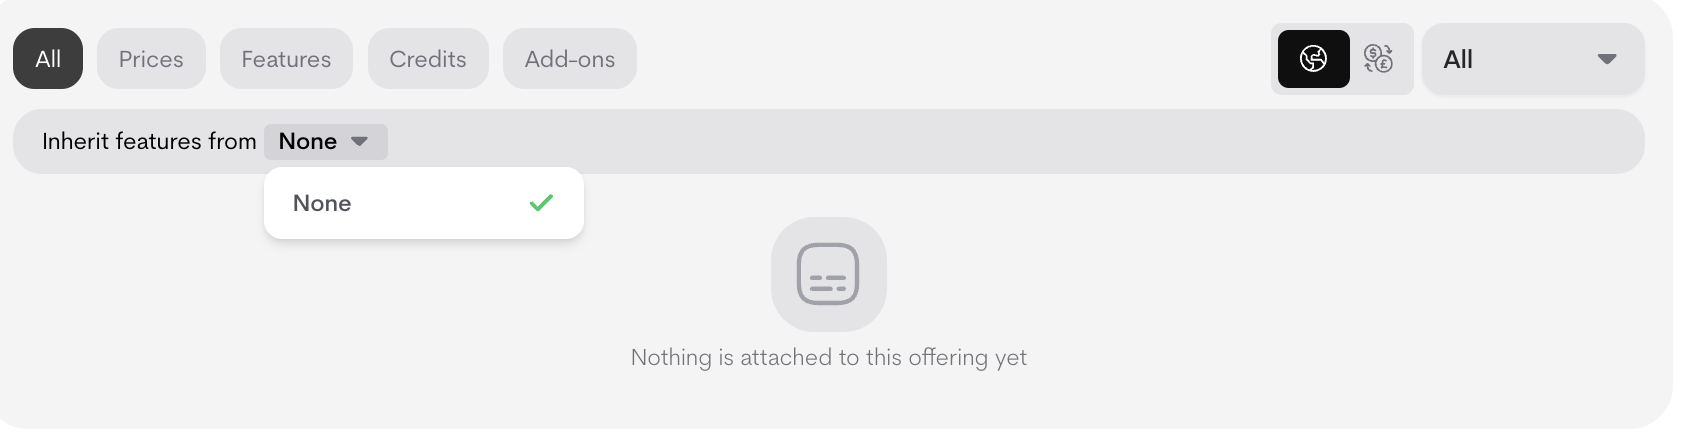
Draft plans start empty (“Nothing is attached to this offering yet”).A plan can have one base price and multiple features, credits, add-ons, or one-time fees.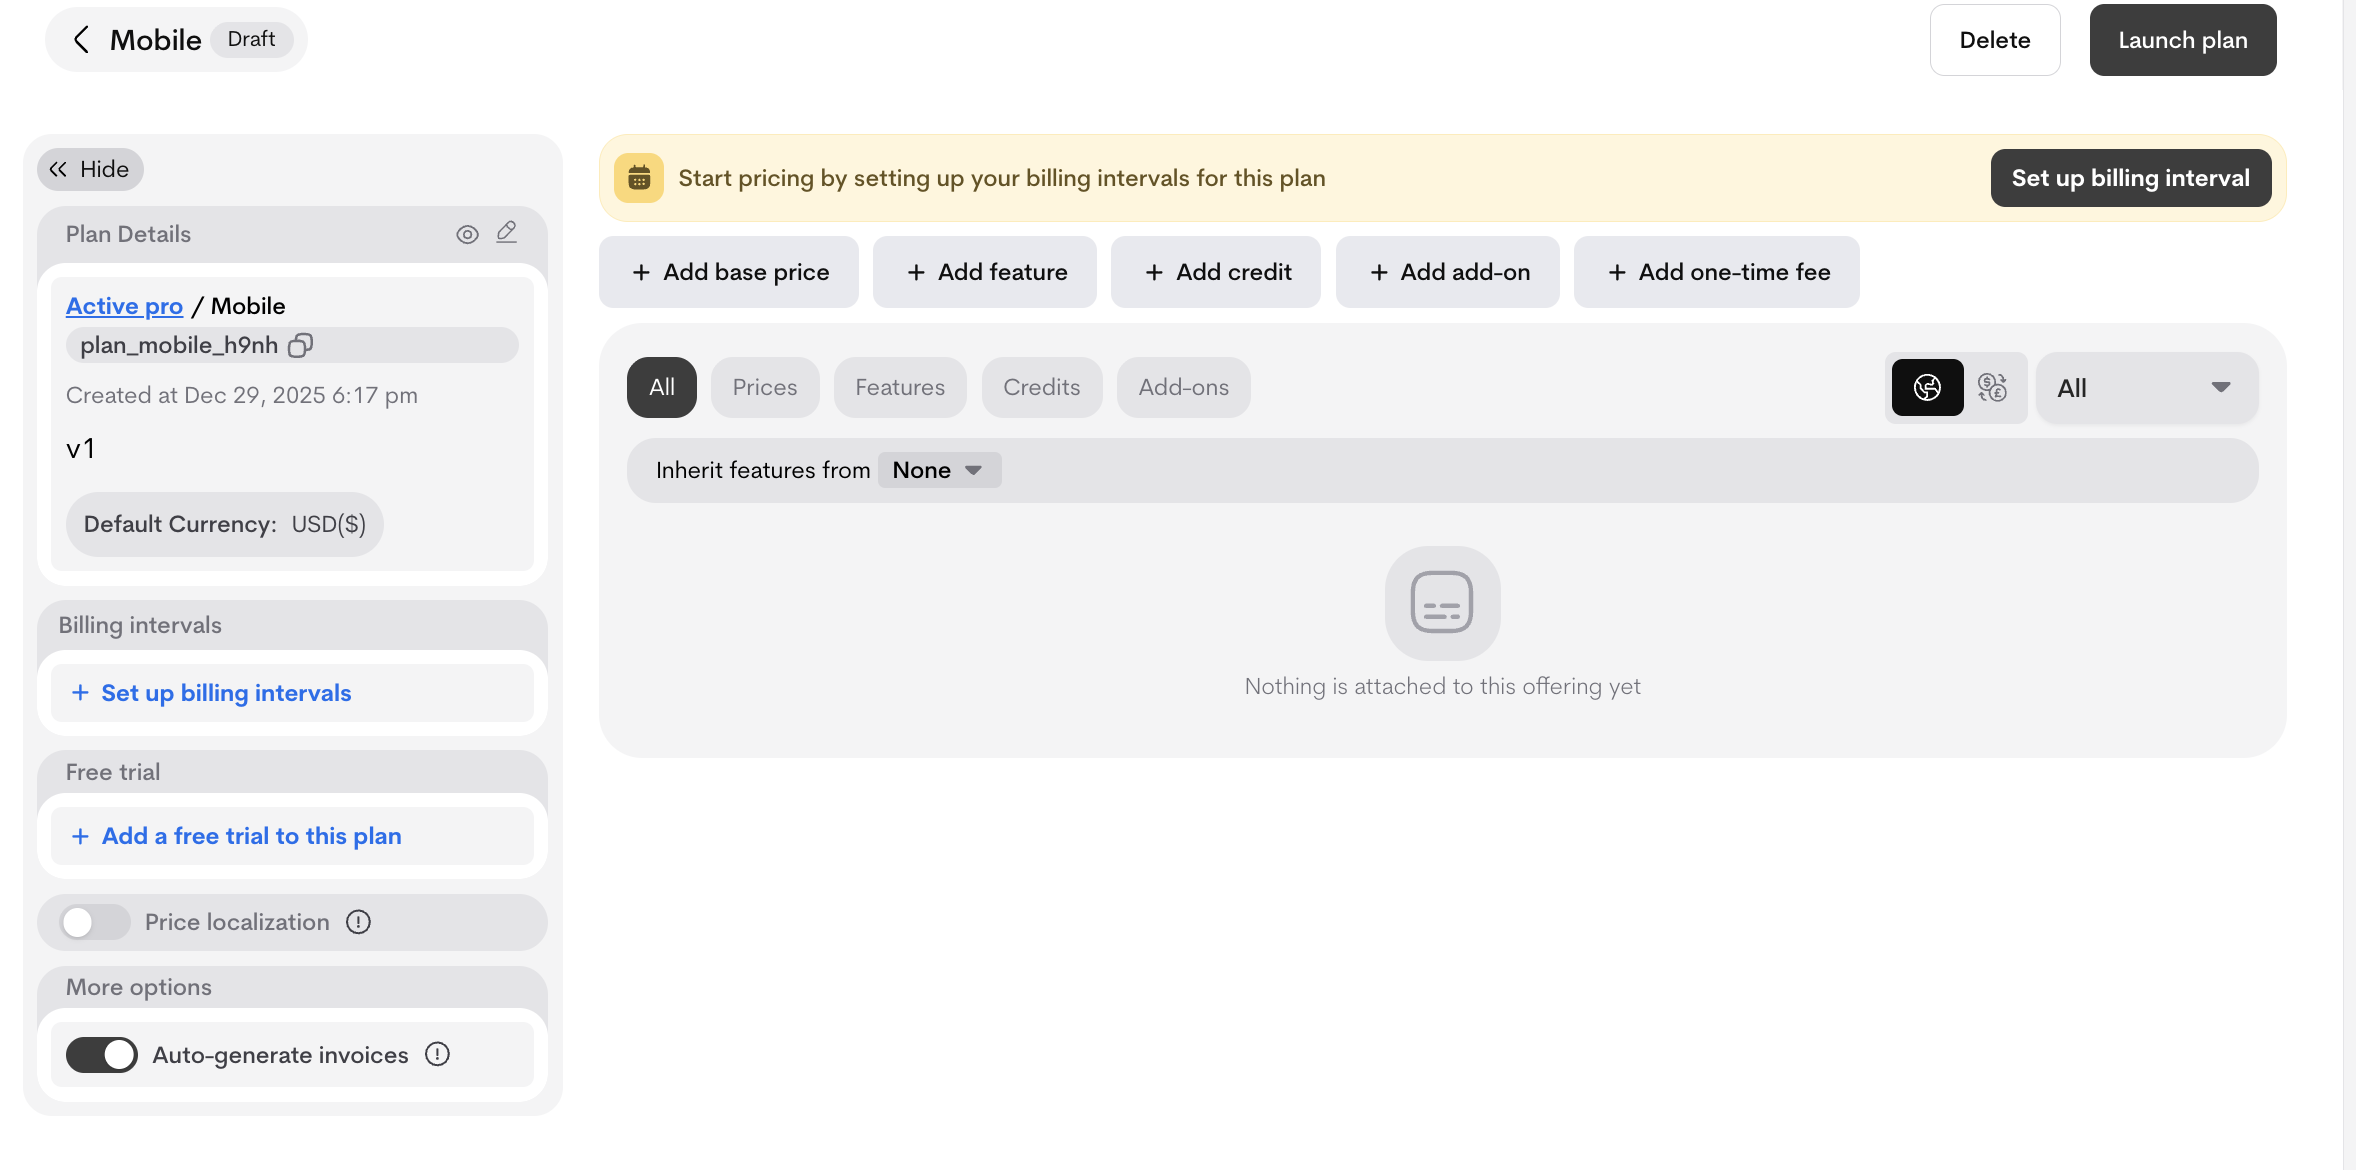
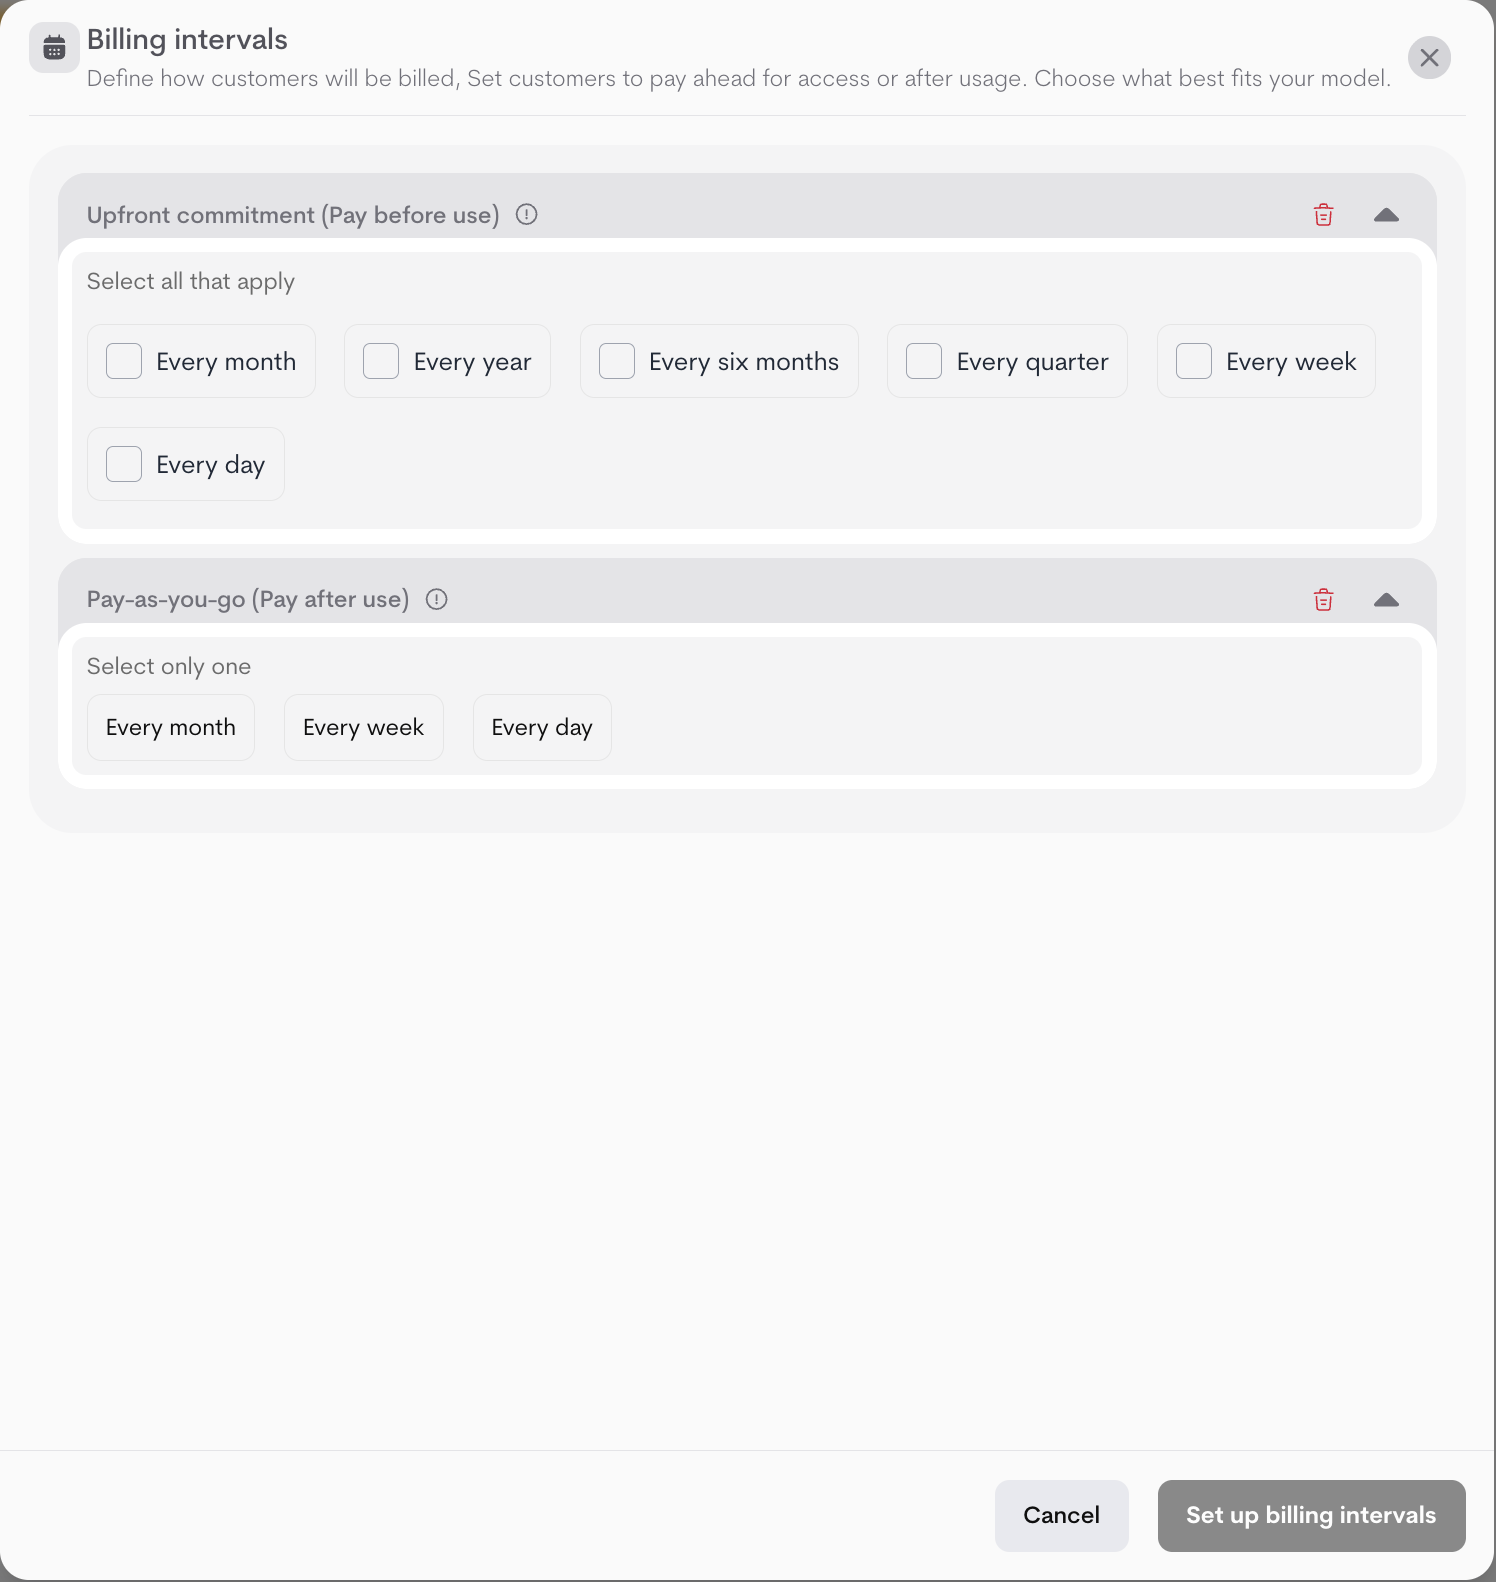
Determine the billing intervals
Choose how frequently customers are billed; One-time, weekly, monthly, quarterly, annually, or custom intervals aligned with consumption patterns. You can choose more than one billing interval. We have two billing timing option:
- Upfront commitment (In advance)
- Customers are invoiced at the end of the billing period, based on their actual usage or outcomes delivered. This approach is ideal for unpredictable or variable usage (e.g. API calls, data processed, server uptime), accumulating usage resources (usage that builds up over time. e.g. email sends, AI messages) and outcome-based models (e.g. qualified leads generated, revenue share)
- Pay-as-you-go (In arrears)
-
Customers are invoiced at the end of the billing period, based on their actual usage or outcomes delivered. This approach is ideal for unpredictable or variable usage (e.g. API calls, data processed, server uptime), accumulating usage resources (usage that builds up over time. e.g. email sends, AI messages) and outcome-based models (e.g. qualified leads generated, revenue share). Supports Monthly, Weekly, and daily only.
Adding Compononents
| Button | Purpose | Billing Options |
|---|---|---|
| + Add base price | Fixed recurring fee for access to the plan (e.g., $99/month seat fee). One per plan. | Upfront commitment only |
| + Add feature | Include or charge for specific features. | Included (free bundle) or Priced (upfront or pay-as-you-go) |
| + Add credit | Prepaid bundles or credit packs. | Included or Priced (usually upfront) |
| + Add add-on | Optional extras customers can purchase separately. | Define your add-on details in the modal |
| + Add one-time fee | Non-recurring charges (e.g., setup fee). | One-time (upfront) |
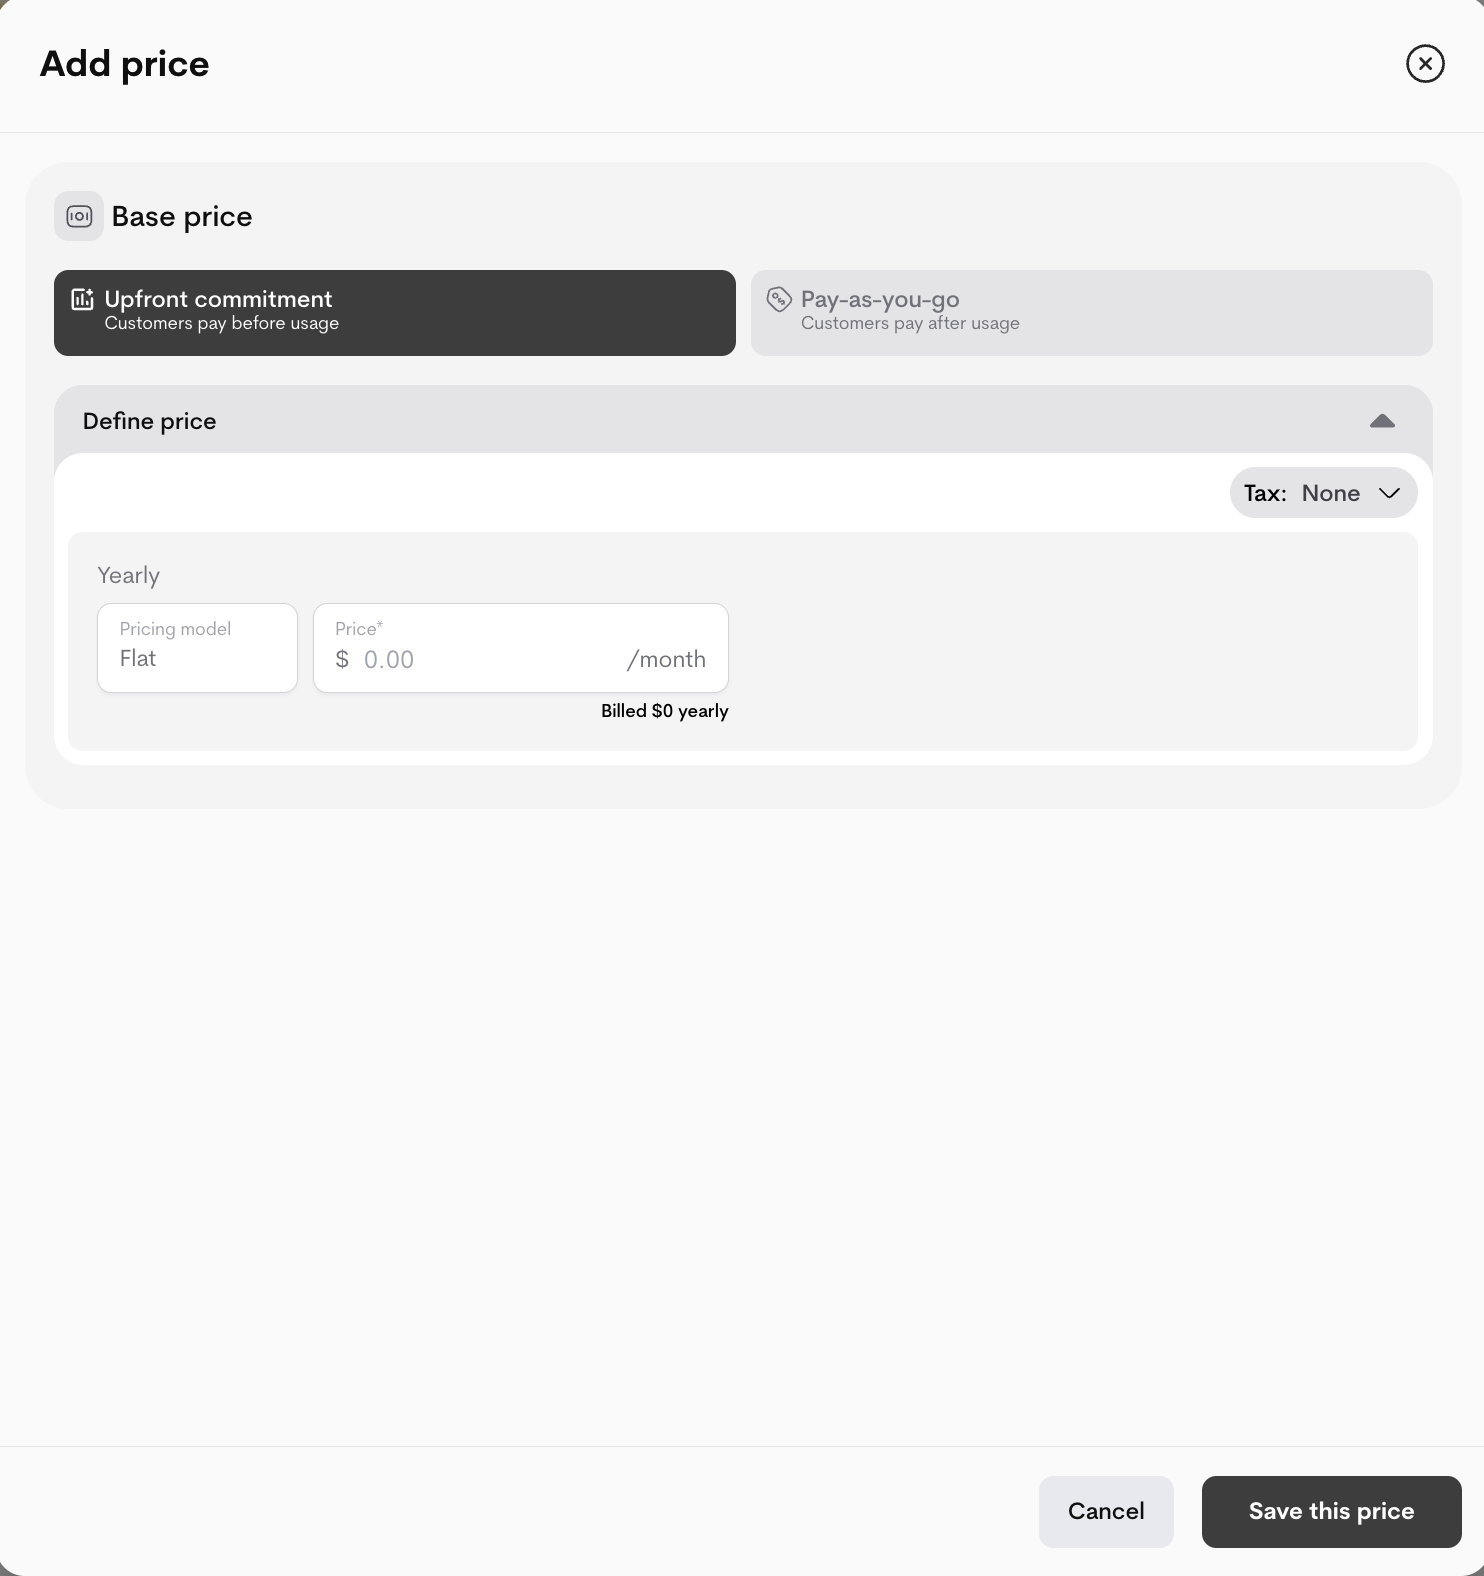
A fixed, recurring charge for access to the plan’s core features. e.g.
$99 / month.A plan can have only one base price.
To set it up:
- Click + Add base price.
- Select either Upfront commitment or Pay-as-You-Go
- (Optional) Select a Tax configuration from the dropdown.
- Enter price per interval (e.g., $99/month).
- Click Save this price.
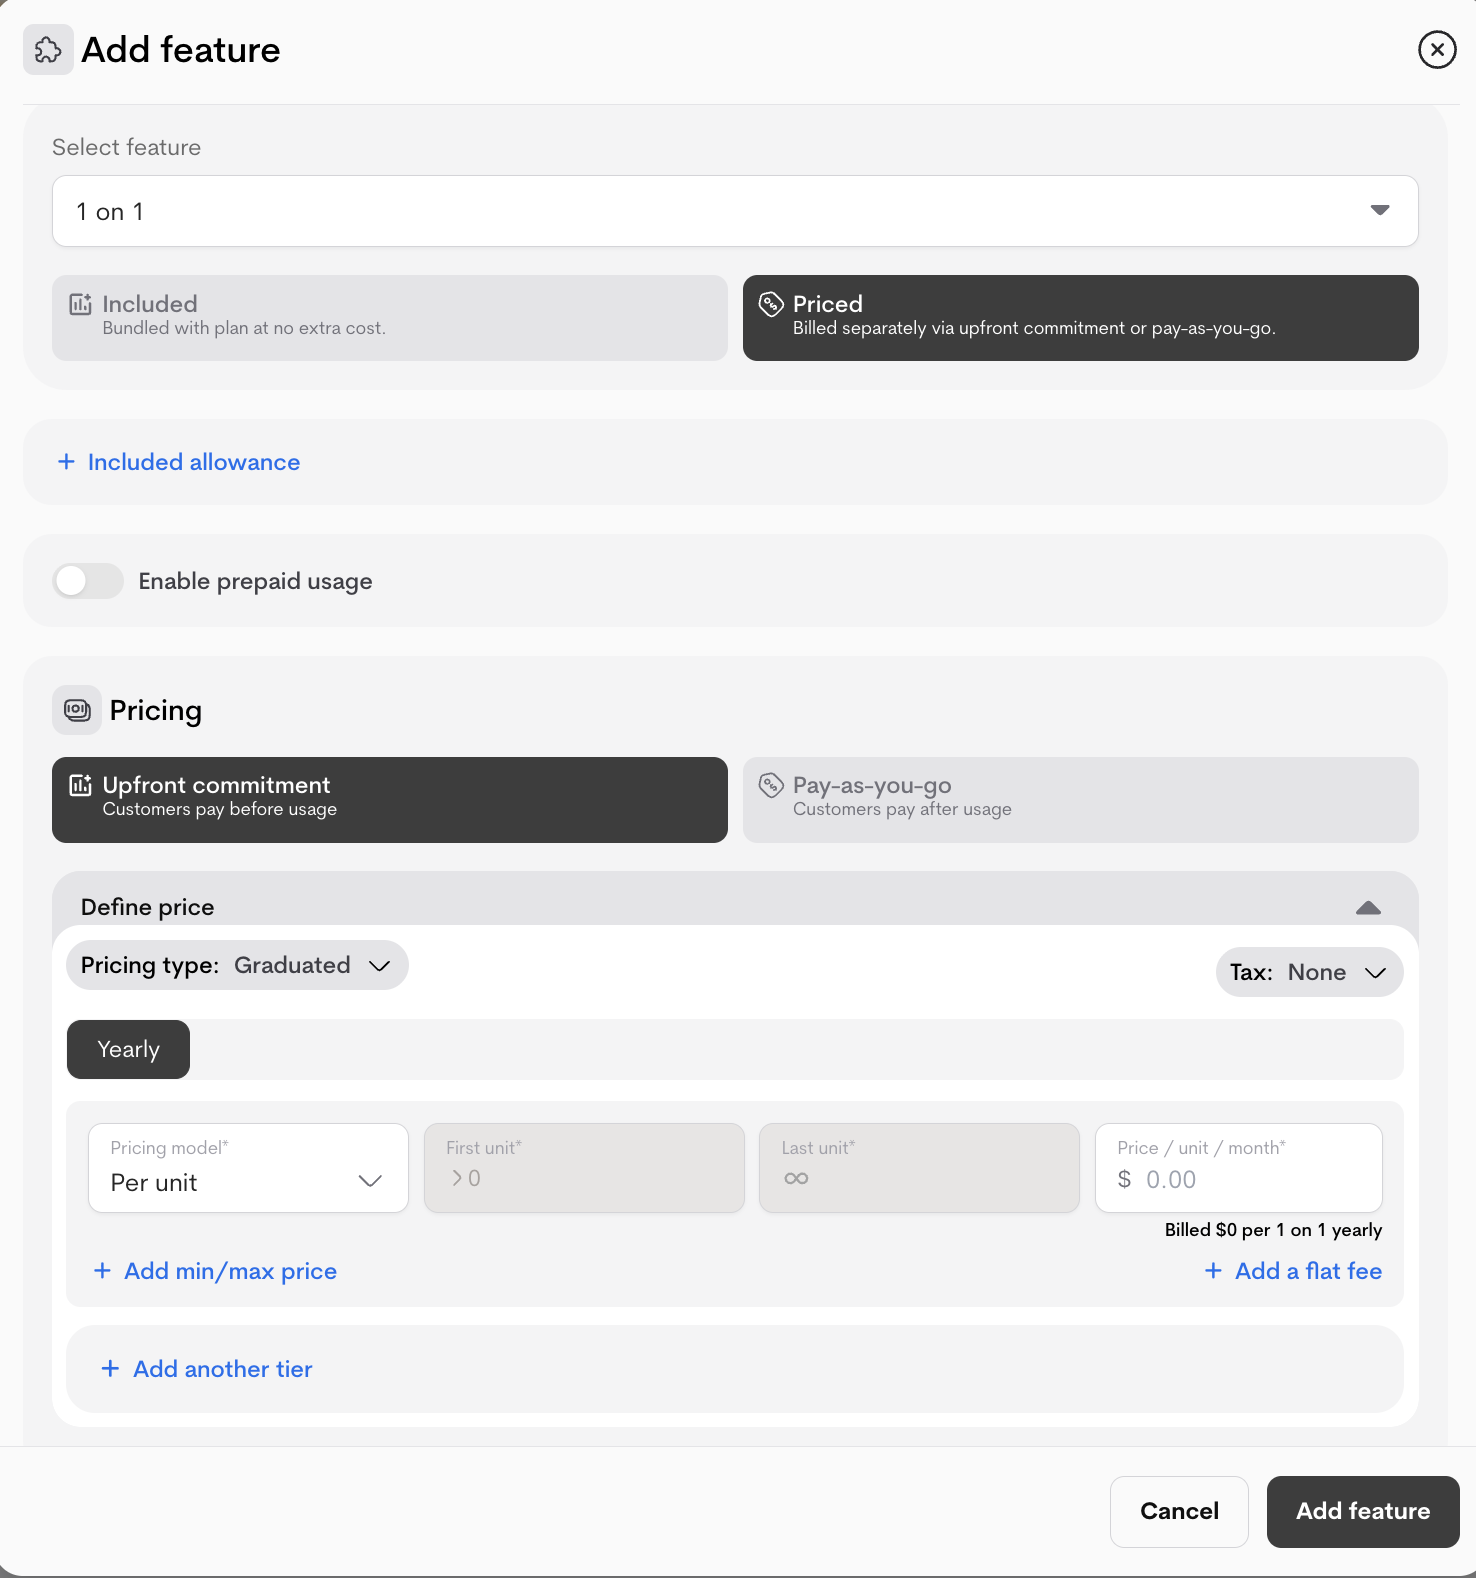
- Click + Add feature.
- Select a feature (or create new via dropdown).
- Choose:
- Included: Bundled free (comes with the plan for free)→ set allowance and reset interval .
-
Priced: Billed separately → select Upfront or Pay-as-you-go, define tiers/pricing per interval, and (optional) apply tax.

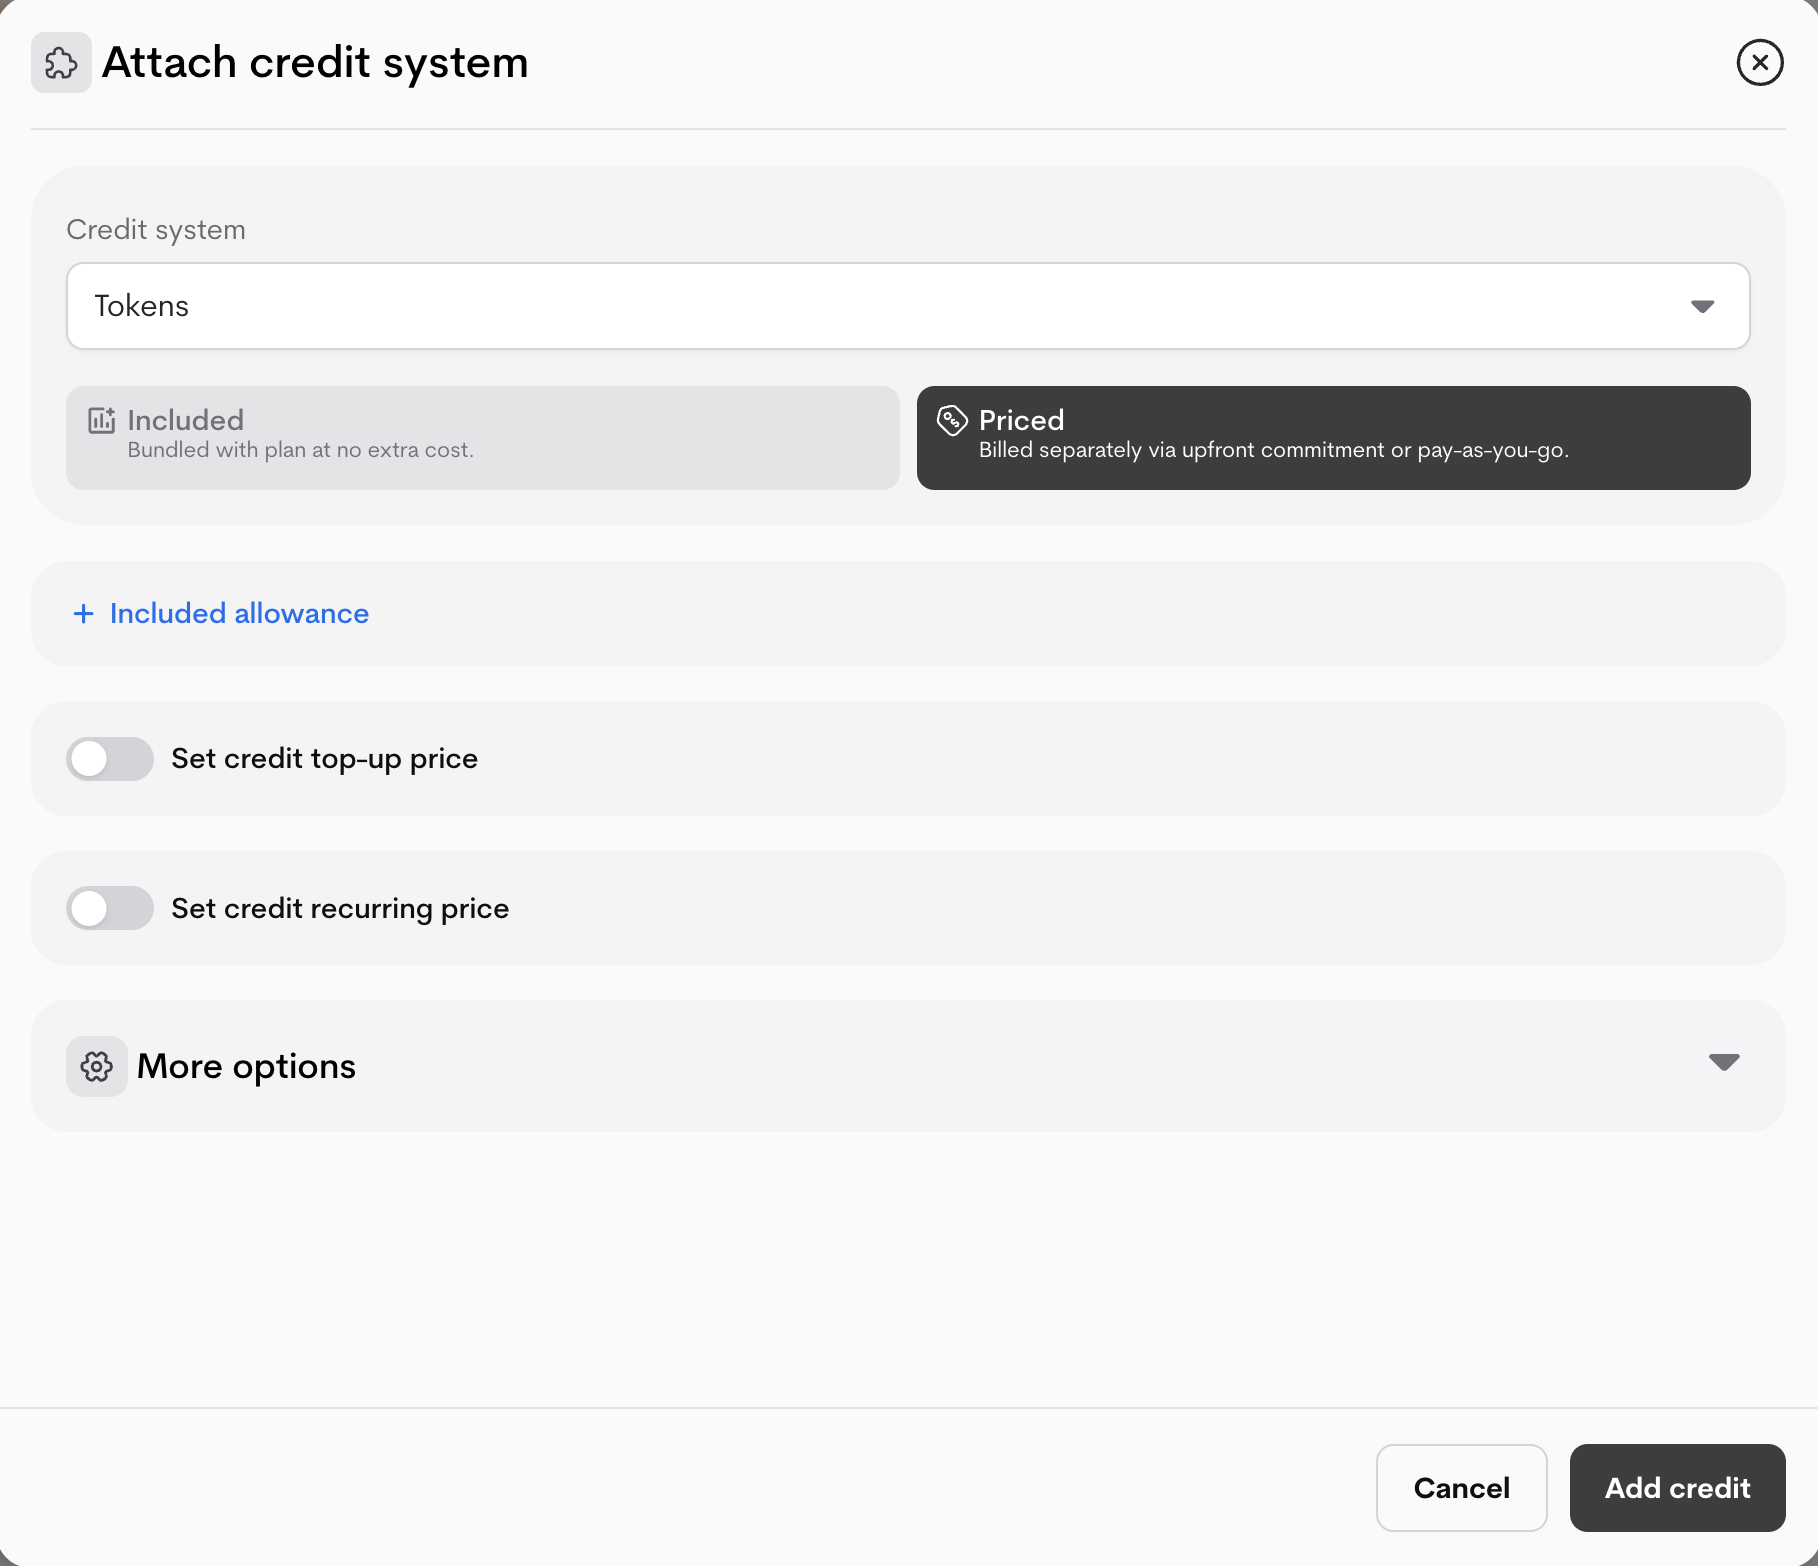
- Click + Add credit.
- Select from the dropdown or create a Credit system (e.g., “coins”).
- Choose:
- Included: Bundled free → set Included allowance (how many credits are granted per cycle).
- Priced: Billed separately → select Upfront commitment or Pay-as-you-go.
- For Priced credits:
-
Set credit top-up price with the toggle(one-time purchase of additional credits):
- Choose Pricing type (e.g., Graduated).
- Select Pricing model (Per unit, Per package, Flat, etc.).
- Define tiers (First unit, Last unit, Price/unit).
- (Optional) Add tax.
- (Optional) Click Add another tier.
-
(Optional) Enable Set credit recurring price toggle for automatic recurring top-ups:
- Select billing intervals and define price per interval (similar tier setup).
-
More options (toggles):
- Minimum/Maximum quantity – Enforce purchase limits.
- Expiration – Credits expire after a period.
- Low credit limit – Trigger notifications or actions when low.
- Mandatory purchase – Require customers to buy credits.
-
Set credit top-up price with the toggle(one-time purchase of additional credits):
Add-ons, One-time Fees Follow similar steps:
-
Add-ons are optional extras.
Connect an add-on to plans to make it available to be bought together.
- In your plan, locate the Add-ons section.
- Click Attach Add-On
- Search for and select the desired add-on(s).
-
Configure attachment settings:
- Mandatory: Automatically added to the order; customer cannot remove.
- Optional: Customer can choose to add it.
- Visibility: Control whether the add-on is visible to customers or admin-only.
- Save the attachment. 👉 Learn more on add-ons
-
One-time fees are non-recurring.
Attaching a fee to a plan tells Metrifox when to apply the charge.
- In your plan, locate the One-time Fees section.
- Click Attach a One-Time Fee.
- Search for and select the desired fee.
-
Configure the Trigger: This defines when the charge is applied.
-
Upon First Purchase: The fee is charged only the first time a customer checks out with this offering. Ideal for one-time setup fees.
Example: A $50 setup fee is charged on the initial signup. If the customer cancels and resubscribes later, they are not charged again.
-
On Every Purchase: The fee is charged every time a customer checks out with this offering. Ideal for fees like shipping or handling.
Example: A $10 shipping fee is charged every time a customer purchases a physical add-on.
-
Upon First Purchase: The fee is charged only the first time a customer checks out with this offering. Ideal for one-time setup fees.
- Save the attachment. 👉 Learn more on one-time fees
- For any priced component, you can optionally apply a Tax configuration from the dropdown.
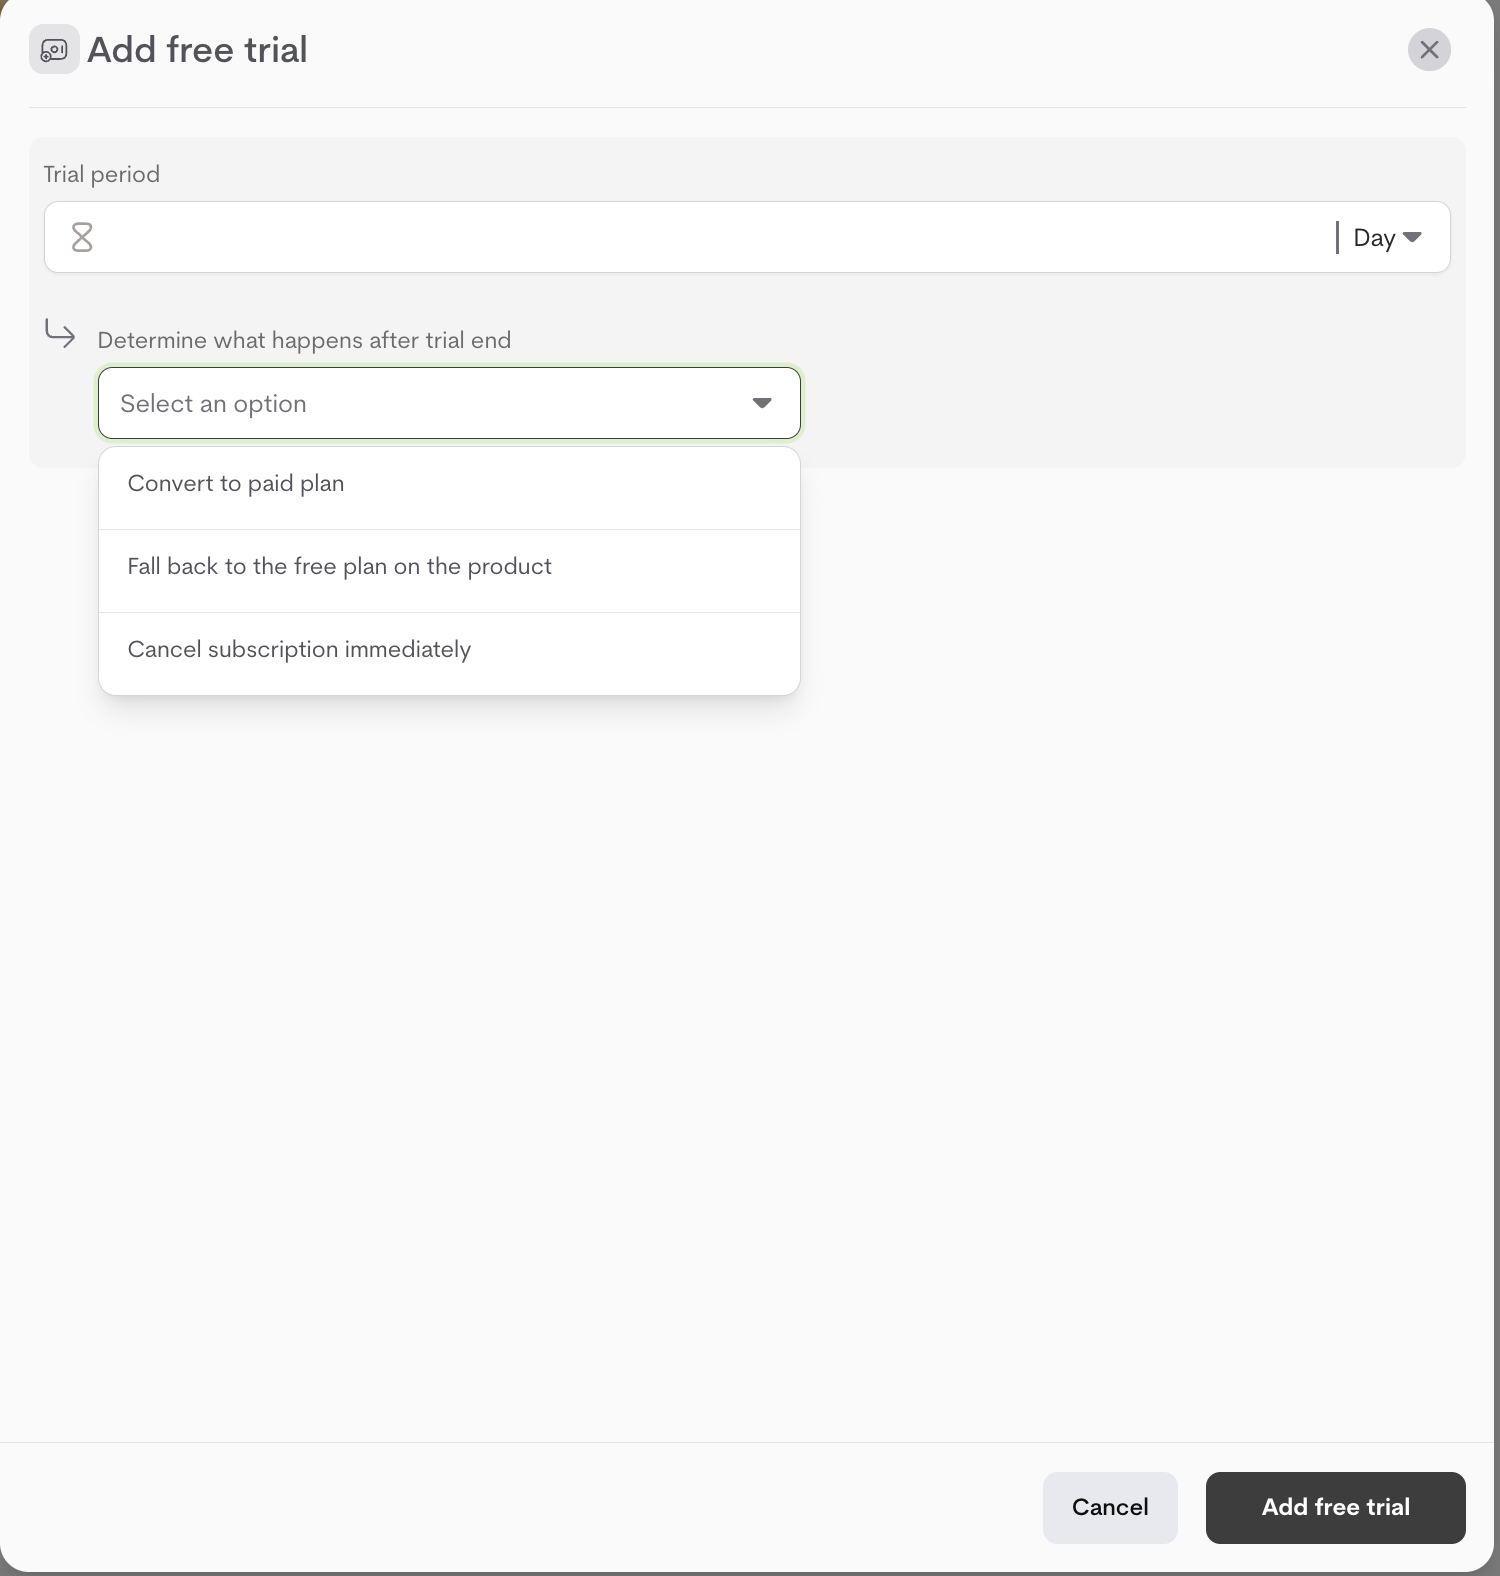
- In the plan editor, click Add free trial.
- Set the Trial period in days (e.g., 14).
- Choose what happens at trial end:
- Convert to paid plan: Automatically starts billing on the selected plan.
- Fall back to the free plan on the product: Downgrades to the product’s free/default plan (if one exists).
-
Cancel subscription immediately: Ends access entirely.
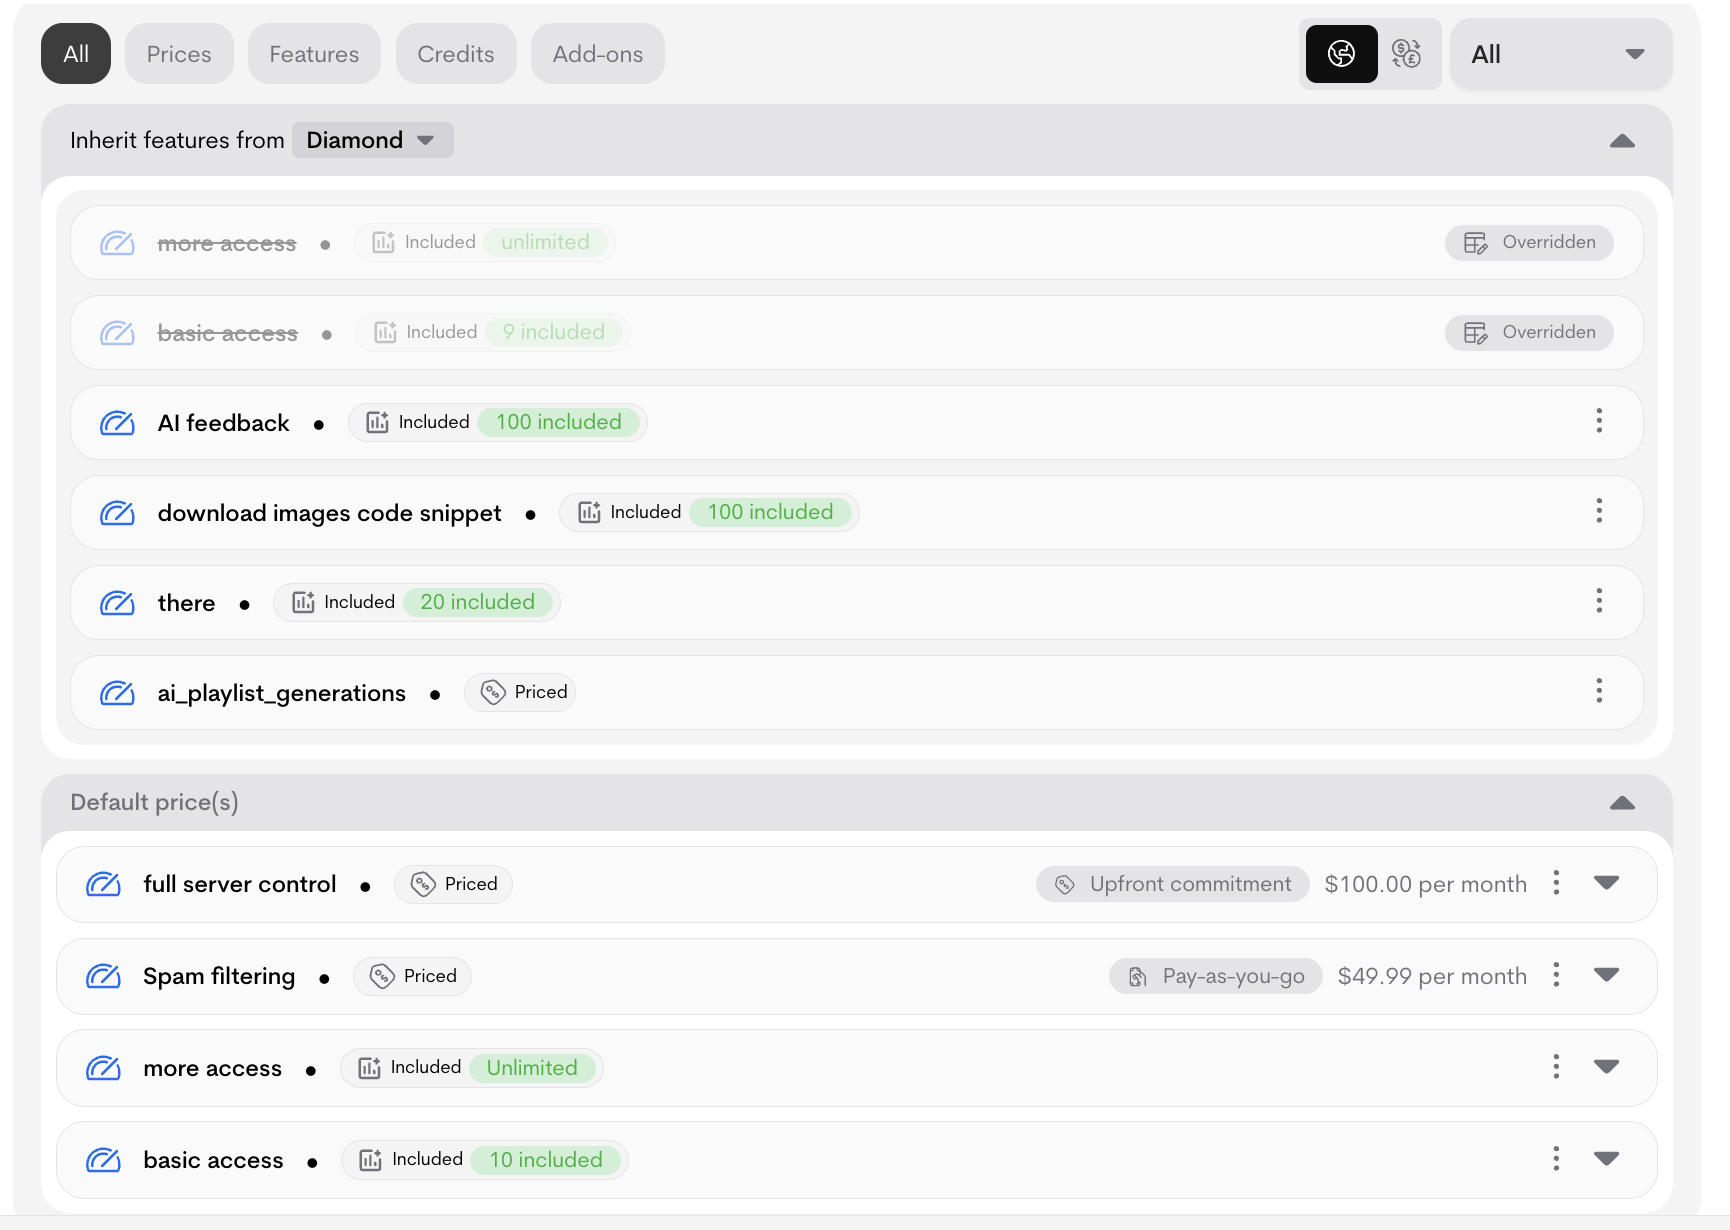
Inheriting Entitlements from Other Plans
Metrifox supports plan inheritance, allowing admins to streamline entitlement management across multiple plans. When inheritance is enabled:- The child plan automatically includes all entitlements from its base plan.
- Any updates to the base plan’s entitlements are propagated instantly to the child plan.
- This enforces a Good–Better–Best model without manual duplication or maintenance overhead.
- Navigate to the “All” or “Features” section of the selected plan
- Locate the “Inherit features from”
-
Select the plan you want to inherit the features.
Overriding Inherited feature configurations
When a plan inherits from a base plan, you can override specific feature configuration in the child plan.- In the Features section on the plan page, click “Attach” to add the same feature and follow the prompt.
- Click “Done”
An overridden feature configuration will be struck out and blurred out in the Metrifox UI, reflecting that it is no more useful, the new, overriding value will be displayed prominently. Boolean features cannot be overridden.
Displaying Features
- Control Visibility: Click the
⋮menu → “Toggle on/off visibility” to hide a feature from public pricing tables. - Customize Display Text: You can override the auto-generated text, click the
⋮menu → “Edit display text ” (e.g., change “100 API calls” to “100 Requests/Mo”).
- Click the
⋮menu on the feature row and select “Remove”. Confirm the action.
Launching Your Plan
When ready:- Review all configurations across tabs (Prices, Features, Credits, Add-ons).
- Click Launch plan.
- Draft plans can be edited freely with no restrictions.
- Once a plan is launched, you cannot edit it directly. Any changes create a new version of the plan. This ensures transparency and safety:
- Existing customers stay on their original version (no unexpected changes to pricing or entitlements).
- New customers (or upgrades) automatically get the latest launched version.
- To update a live plan:
- Make changes to the current version (this automatically creates a draft of a new version).
- Review and test the new version.
-
Click Launch plan to publish the new version.
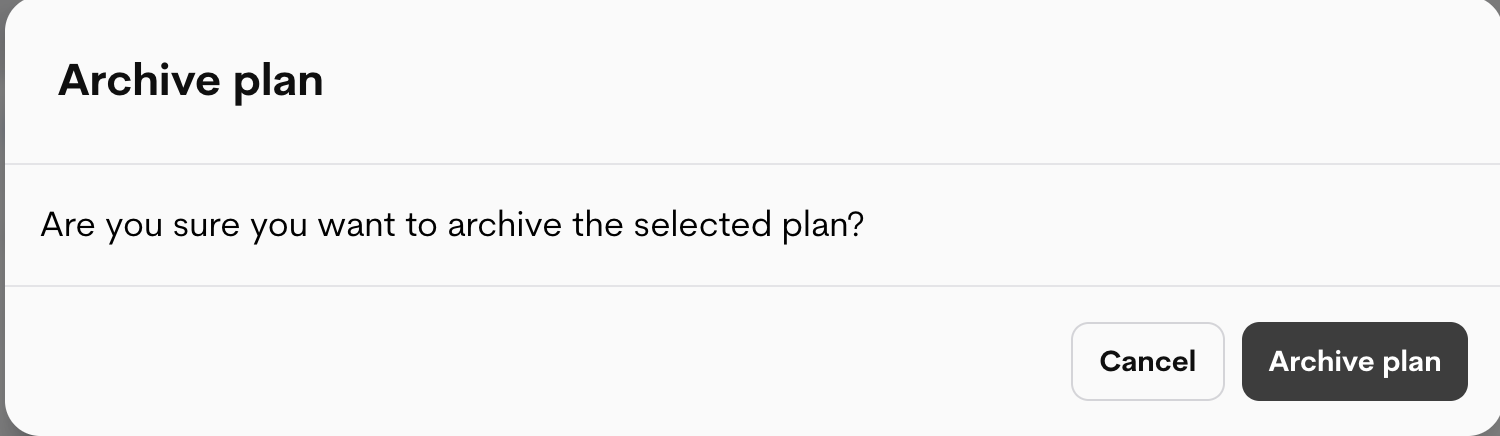
- Archived plans disappear from pricing tables and cannot be selected for new subscriptions.
- Current customers keep access to their version.
- You can unarchive later if needed.
- Changes to drafts don’t affect live customers.
- New plan versions do not automatically migrate existing subscribers, they stay on their current version.
- Enable Auto-generate invoices in plan details for automatic invoicing.
- The display order in customer-facing pricing tables (e.g., left-to-right: Free → Starter → Pro → Enterprise).
- Recommended upgrade paths (e.g., marking “Pro” as the suggested upgrade from “Starter”).
- Default fallback behavior (e.g., for trials ending or downgrades).
- Go to the product details page (Catalog → Products → [Your Product]).
- Go to the Plans tab.
-
Look for the Hierarchy section.

-
Drag and drop plans to reorder them, or use up/down arrows.
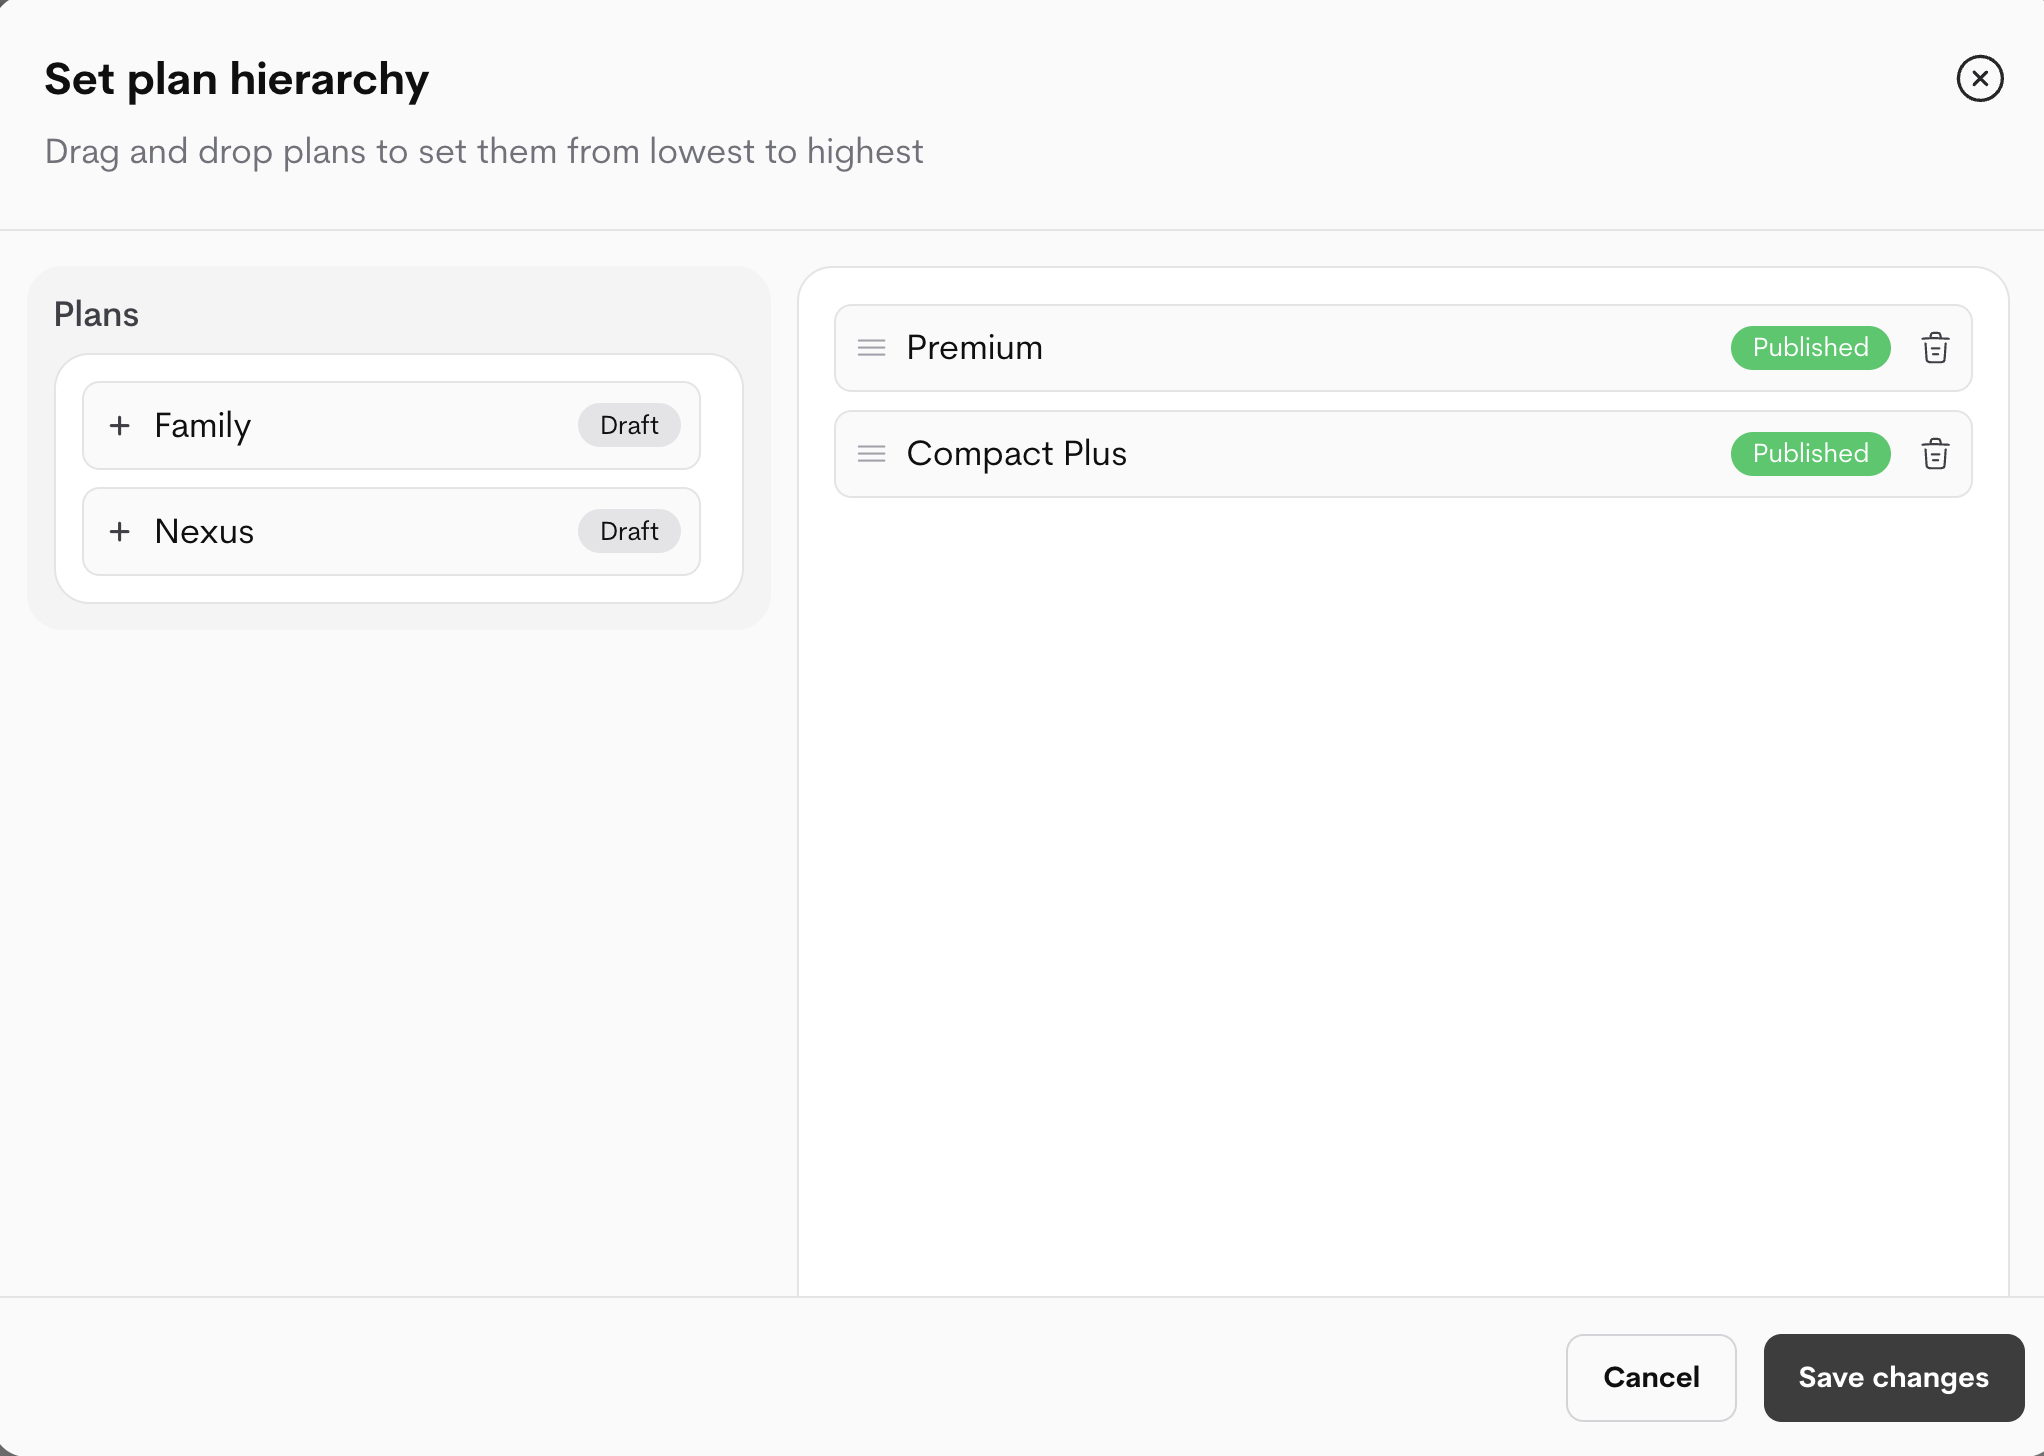
- Save changes, the order updates immediately in live pricing tables.